How to Customize Checkout Page in WooCommerce
How to customize the WooCommerce checkout page on the Checkout block and the classic shortcode: editor layout, custom fields with working code, a method table and common mistakes, checked 14 November 2026.
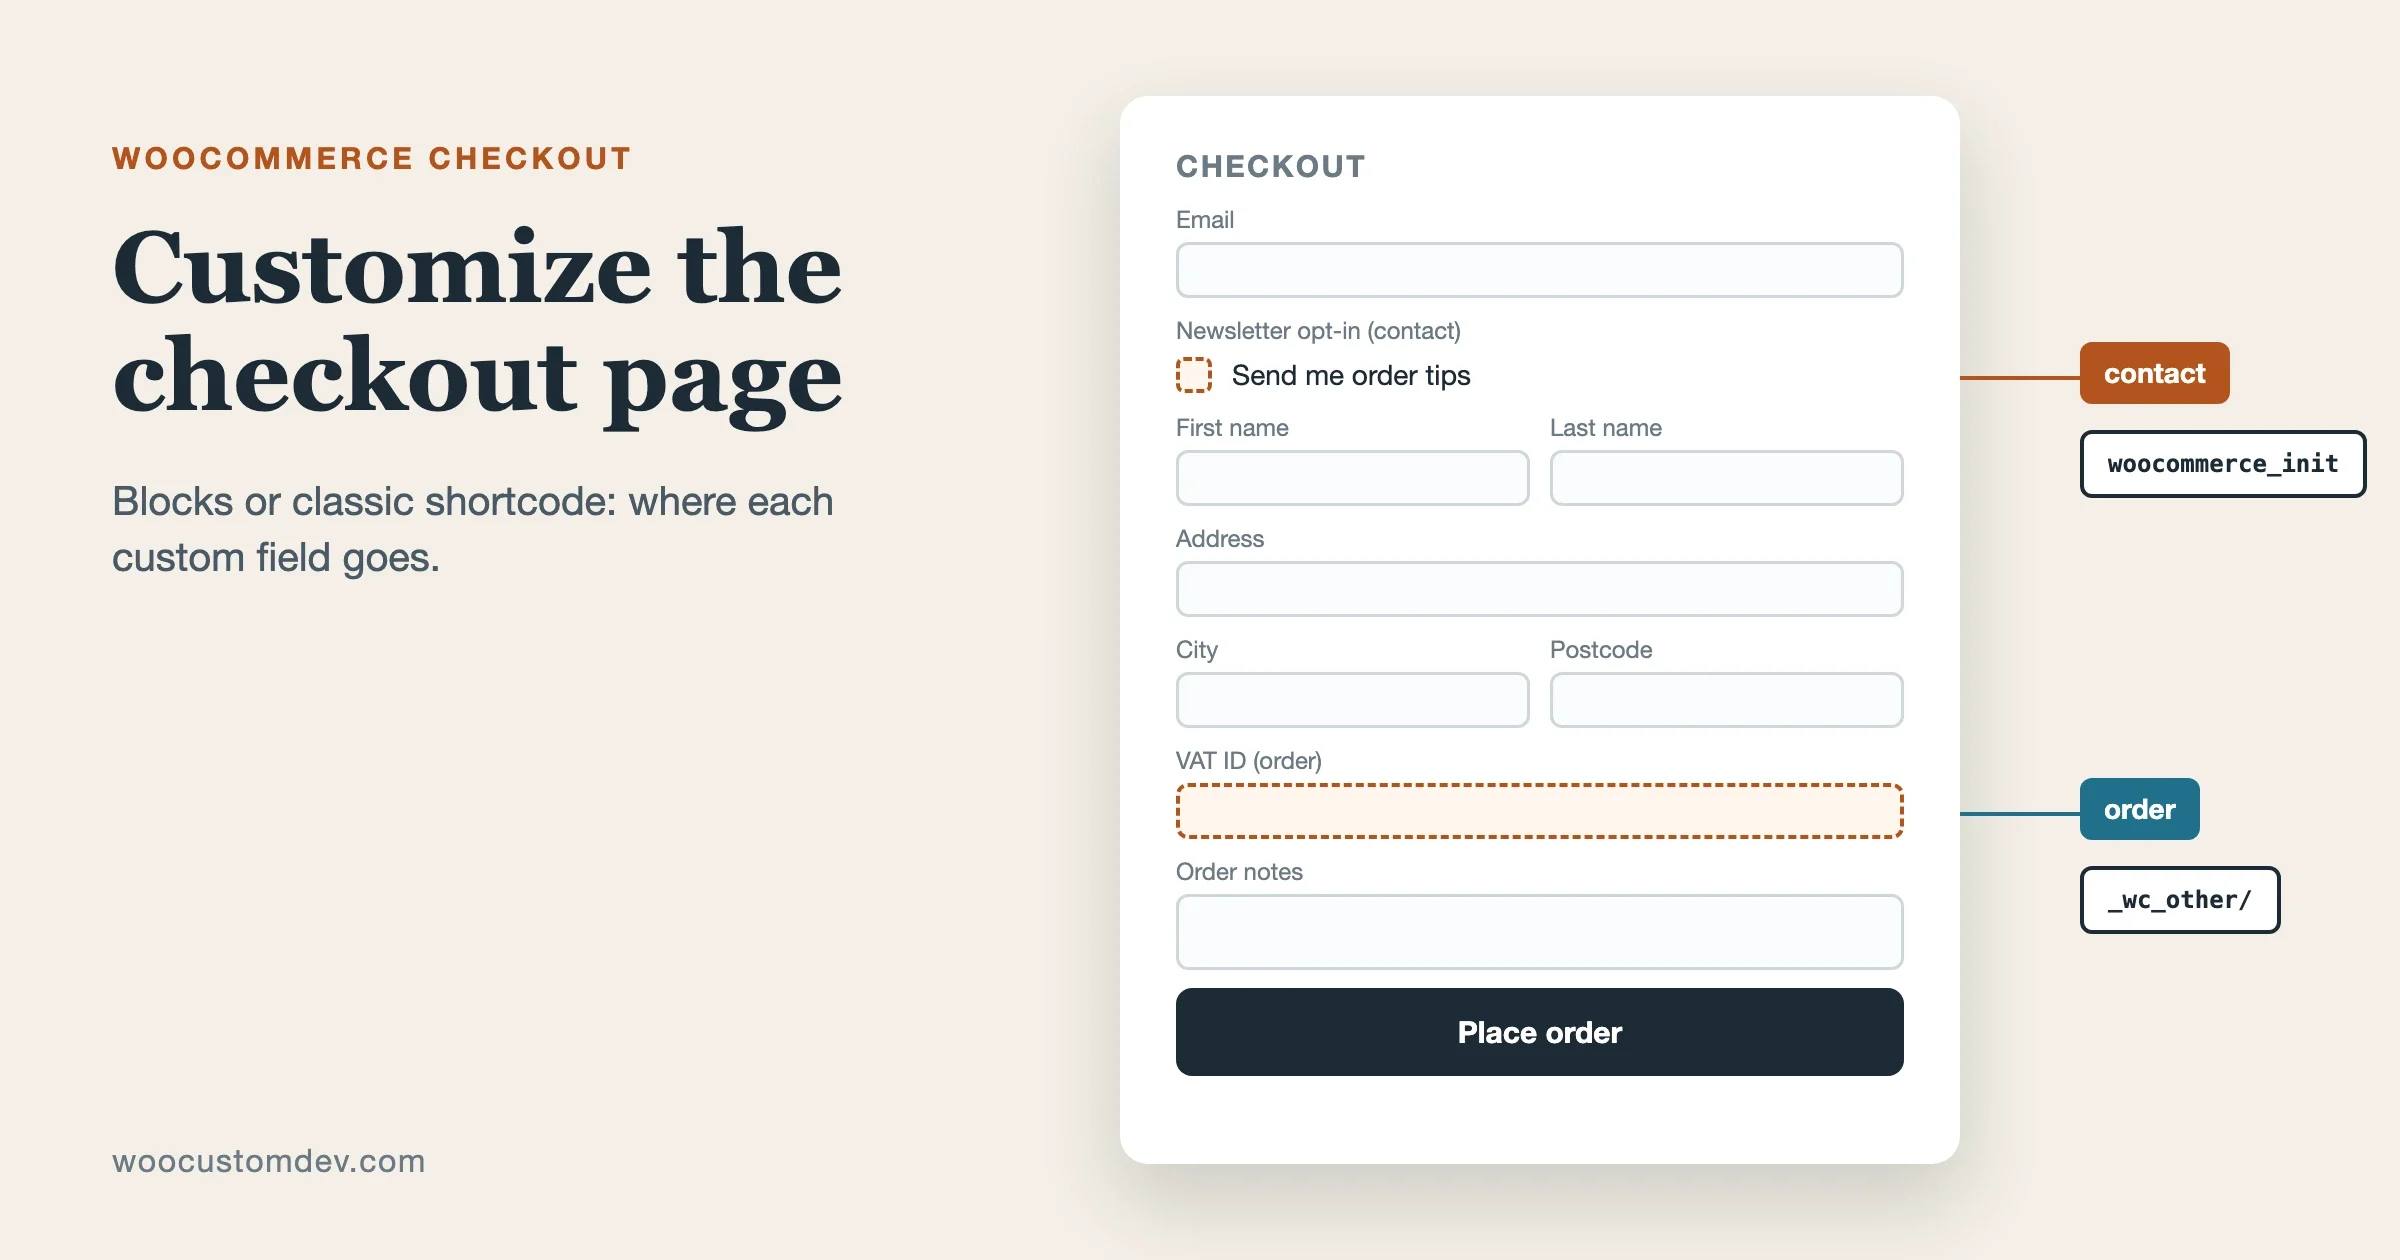
Which way you customize the WooCommerce checkout page depends on which checkout your store runs. On a new store that is the Checkout block, and you change layout and wording in the editor and add fields with the additional checkout fields API. On an older store it is probably still the classic [woocommerce_checkout] shortcode, and you change fields with the woocommerce_checkout_fields filter. Code written for one does not carry over to the other, and that mismatch causes most of the “my customization does nothing” reports.
This guide covers both, with working code for each, a table to pick a method, and a box of the mistakes people keep reporting. We checked every WooCommerce claim below against the official developer and merchant documentation on 14 November 2026, when the current release on WordPress.org was WooCommerce 11.3.0. If you are moving from classic to blocks, read our checkout blocks migration guide first, because this post does not repeat it.
How do I customize the WooCommerce checkout page?
Start by finding out which checkout you have, then pick the lightest tool that does the job. Layout and styling happen in the editor. Fields happen in code or in a field plugin. Whole-flow redesigns (one-step checkout, order bumps, upsells) usually mean a checkout plugin.
- Identify your checkout (next section). Ten seconds, and it decides everything else.
- Change layout, wording and styling in the block editor (blocks) or the theme and CSS (classic).
- Add, remove or reorder fields with the additional checkout fields API (blocks) or the
woocommerce_checkout_fieldsfilter (classic). - Test a real order on staging with a test payment method, on a phone as well as a desktop.
Settings alone go further than people expect. Guest checkout and account creation live under WooCommerce, Settings, Accounts & Privacy. You can reach a surprising amount without a plugin, and that is the answer to the common question of whether you can customize the checkout page for free: yes, the editor, the settings screens and a few lines of code are all included with WooCommerce itself.
Which checkout does my store use: the Checkout block or the classic shortcode?
Open the Checkout page in the editor. If you see a Checkout block with inner blocks for contact information, shipping and payment, you are on blocks. If you see a single shortcode placeholder reading [woocommerce_checkout], you are on the classic shortcode checkout.
WooCommerce’s own documentation says that for stores started after version 8.3 (November 2023), the Cart and Checkout blocks are the default experience and need no setup. Older stores keep whatever they had until someone changes it, so a store from 2021 is very likely still on the shortcode.
You can switch back. In the editor, open the List View, select the Checkout block, use Transform in the block toolbar and choose Classic Shortcode, then save. WooCommerce’s guide recommends reverting both the Cart and the Checkout pages together because the two blocks work as a pair. The Payment Options block also offers a one-click switch back to classic when a payment gateway is not compatible with the block.
Question | Checkout block | Classic shortcode |
|---|---|---|
What you see in the editor | Inner blocks you can select and move | One |
Where layout is edited | Site Editor template or the page itself | Theme templates, theme CSS, a page builder |
How fields are customized |
|
|
Do classic PHP display hooks render markup? | No, the block draws itself in the browser | Yes |
Default for new stores | Yes, since version 8.3 | No |
How do I edit the checkout page layout and design in the block editor?
Go to Appearance, Editor, Templates, WooCommerce and open “Page: Checkout”. You can rearrange and style the blocks there, and the WooCommerce documentation points to the same path. If your theme is not a block theme, edit the Checkout page under Pages, All Pages instead.
The Checkout block is the main container. It brings together customer details, shipping and delivery, payment methods and the order summary, and the template lets customers apply coupons and agree to terms. The default header is deliberately simplified to the site title and logo, which keeps people focused on paying. Leave it that way unless you have a real reason.
Select the Checkout block and look at the sidebar. Its options change between WooCommerce versions, so use WooCommerce’s own guide to customizing the Cart and Checkout pages and the checkout template page for the current list rather than trusting a screenshot from a blog.
What the editor does well:
- Moving blocks around and changing spacing, colours and typography to match your theme.
- Editing the checkout header, so it shows your logo and nothing else.
- Adjusting the options each block exposes in its sidebar.
- Adding your own content blocks (a short trust note near the pay button, for example) where the block layout allows it.
What it does not do: it does not let you invent new form fields by dragging. For that you need the API in the next section.
How do I add custom checkout fields in the Checkout block?
Register the field in PHP with woocommerce_register_additional_checkout_field(), on the woocommerce_init action or later. This is the supported route for the Checkout block. The documentation warns that registering earlier can cause initialization and translation problems.
Each field needs three things: an id in namespace/field-name form, a label (which doubles as the placeholder) and a location. The location is contact, address or order. The optional type can be text, select, checkbox or date, and defaults to text. Fields are optional unless you set required to true.
add_action( 'woocommerce_init', function () {

	// Saved on the order only. Good for a VAT ID or a PO number.
	woocommerce_register_additional_checkout_field( array(
		'id'       => 'wcd/vat-id',
		'label'    => 'VAT ID (optional)',
		'location' => 'order',
		'type'     => 'text',
		'required' => false,
	) );

	// Saved to the customer's account as well.
	woocommerce_register_additional_checkout_field( array(
		'id'       => 'wcd/marketing-opt-in',
		'label'    => 'Send me order tips and offers',
		'location' => 'contact',
		'type'     => 'checkbox',
	) );
} );
Checked on 14 November 2026 against the additional checkout fields documentation. The two examples follow its pattern; treat the field ids as ours to rename.
Which location should a field use?
The location decides where the value is stored, and getting it wrong is the source of a real support problem (see the mistakes box below).
Location | Where it appears | Where the value is saved |
|---|---|---|
| Contact information section | The shopper’s account, editable under Account details. One value per field. |
| Both the shipping and billing address forms | The customer and the order, with separate shipping and billing values. |
| Order information section | The order only, never the customer account. One value per field. |
Values are stored in order meta under prefixes: _wc_billing/ and _wc_shipping/ for address fields, and _wc_other/ for contact and order fields. The documentation recommends the helper methods get_field_from_object (one value) and get_all_fields_from_object (all values) over reading meta keys yourself. Direct meta access works for external engines, page builders and email builders, but it is the less safe choice.
How do I validate or sanitize a block checkout field?
WooCommerce provides hooks and per-field callbacks. The woocommerce_sanitize_additional_field filter sanitizes a value and runs before validation. The woocommerce_validate_additional_field action validates one field, and you report problems by adding errors to the WP_Error object it hands you. For checks that need several fields at once, woocommerce_blocks_validate_location_{location}_fields validates fields in the context of their location. The address location fires it twice, once for billing and once for shipping.
Each field also accepts sanitize_callback and validate_callback options as per-field equivalents, and JSON Schema in the required, hidden and validation options supports conditional logic, for instance a field that is only required for business customers. Read the documentation page for the exact callback signatures before you write one, because we did not want to guess them here.
Can the block checkout carry over fields I already had in classic?
Partly. The documentation says you cannot pick the meta key directly for these new fields, so old shortcode fields cannot simply be reused. It offers two bridges. The woocommerce_set_additional_field_value action runs when a field is saved, so you can write the value to your existing meta as well. The woocommerce_get_default_value_for_{$key} filter supplies a default when a field is read, so you can map existing meta in. The documentation’s advice is to migrate old data to the new meta fields eventually.
What about inner blocks, filters and slot fills?
Those are the JavaScript side of block checkout extensibility. WooCommerce’s extensibility in blocks page lists them: filters that change values in the blocks, slot fills that render your own components inside Cart and Checkout, custom inner blocks, the Store API for sending extra data, and server-side action and filter hooks. They need a build step and React knowledge. For a store owner who wants a VAT field, they are overkill. For a plugin author, they are the real toolbox.
How do I customize checkout fields in the classic shortcode checkout?
Use the woocommerce_checkout_fields filter. WooCommerce passes all checkout fields through it, you edit the array and return it. Fields are grouped as billing, shipping, account and order, and each field accepts properties such as label, placeholder, class, required, clear, label_class and priority.
The documented field keys include billing_first_name, billing_company, billing_address_1, billing_address_2, billing_phone, billing_email, the matching shipping_* keys (without email and phone) and order_comments. Higher priority numbers run later, the default step is 10, and the documentation suggests moving in increments of 10.
add_filter( 'woocommerce_checkout_fields', 'wcd_tune_checkout_fields' );

function wcd_tune_checkout_fields( $fields ) {

	// Change the order notes prompt.
	$fields['order']['order_comments']['placeholder'] = 'Delivery notes, gate codes, anything we should know';

	// Make company optional and drop the second address line.
	$fields['billing']['billing_company']['required'] = false;
	unset( $fields['billing']['billing_address_2'] );

	// Move the phone field. Dump $fields once to see the
	// default priorities in your version before you pick numbers.
	$fields['billing']['billing_phone']['priority'] = 25;

	return $fields;
}
Checked on 14 November 2026 against WooCommerce’s customising checkout fields page. Removing a field with unset and changing placeholders follow its examples.
How do I add a brand-new field to the classic checkout?
The documented pattern has four steps: display the field, validate it, save it, show it in the admin order screen. The hooks named in the documentation are woocommerce_after_order_notes (display, using woocommerce_form_field()), woocommerce_checkout_process (validate, report with wc_add_notice()), woocommerce_checkout_update_order_meta (save) and woocommerce_admin_order_data_after_billing_address (admin display).
// 1. Display the field after the order notes.
add_action( 'woocommerce_after_order_notes', 'wcd_vat_field' );
function wcd_vat_field( $checkout ) {
	woocommerce_form_field( 'wcd_vat_id', array(
		'type'        => 'text',
		'class'       => array( 'form-row-wide' ),
		'label'       => 'VAT ID (optional)',
		'placeholder' => 'e.g. DE123456789',
	), $checkout->get_value( 'wcd_vat_id' ) );
}

// 2. Validate. WooCommerce has already checked the checkout nonce.
add_action( 'woocommerce_checkout_process', 'wcd_vat_validate' );
function wcd_vat_validate() {
	// phpcs:ignore WordPress.Security.NonceVerification.Missing
	$vat = isset( $_POST['wcd_vat_id'] ) ? sanitize_text_field( wp_unslash( $_POST['wcd_vat_id'] ) ) : '';
	if ( '' !== $vat && ! preg_match( '/^[A-Z0-9 ]{6,20}$/i', $vat ) ) {
		wc_add_notice( 'Please check the format of your VAT ID.', 'error' );
	}
}

// 3. Save it on the order.
add_action( 'woocommerce_checkout_update_order_meta', 'wcd_vat_save' );
function wcd_vat_save( $order_id ) {
	// phpcs:ignore WordPress.Security.NonceVerification.Missing
	if ( empty( $_POST['wcd_vat_id'] ) ) {
		return;
	}
	$order = wc_get_order( $order_id );
	// phpcs:ignore WordPress.Security.NonceVerification.Missing
	$order->update_meta_data( 'wcd_vat_id', sanitize_text_field( wp_unslash( $_POST['wcd_vat_id'] ) ) );
	$order->save_meta_data();
}

// 4. Show it on the admin order screen.
add_action( 'woocommerce_admin_order_data_after_billing_address', 'wcd_vat_admin' );
function wcd_vat_admin( $order ) {
	$vat = $order->get_meta( 'wcd_vat_id', true );
	if ( $vat ) {
		echo '<p><strong>VAT ID:</strong> ' . esc_html( $vat ) . '</p>';
	}
}
Checked on 14 November 2026 against the same documentation page. The hook names come from it; the VAT field, the format check and the meta key are our own example, so adapt the pattern to whatever your store needs to collect. The format check is deliberately loose, and real VAT validation depends on the country.
Keep this code in a small plugin or a child theme, never in a parent theme file that an update will overwrite. And remember the warning from the documentation: installing the WooCommerce Checkout Field Editor extension overrides custom checkout field code, so the two cannot both own the same fields.
Can I customize the WooCommerce checkout page with CSS?
Yes, for both checkouts, and CSS is the safest customization because it cannot break order processing. The catch is that the markup differs. On the classic checkout your CSS targets the form fields by id or class. On the Checkout block the class names come from the block library and have shifted between versions, so inspect the live page with your browser’s developer tools and target what you see, instead of copying class names from an old tutorial.
/* Classic checkout only: a taller order notes box. */
.woocommerce-checkout #order_comments {
	min-height: 7em;
}
Put site-wide CSS in the editor’s Styles panel (block themes) or the Customizer’s Additional CSS (classic themes). If you serve several stores, a child theme stylesheet keeps the change in version control.
How do I make a custom checkout page template in WooCommerce?
Rarely the right move. On the Checkout block, the “template” is the Site Editor template described above, and editing it there is the supported way. On the classic checkout, theme template overrides exist, but a copied checkout template silently falls behind each time WooCommerce changes the original, and checkout is the last page where you want stale markup.
Before you override a template, ask whether a filter, a field API call or CSS would do the job. Most “I need a custom checkout template” requests we see turn out to be a field order, a label and a spacing change.
Which method should I pick: settings, plugin, code or a page builder?
Method | Works on the block checkout | Works on the classic checkout | Needs code | Best for |
|---|---|---|---|---|
WooCommerce settings screens | Yes | Yes | No | Guest checkout, account creation, basics |
Site Editor template | Yes | No | No | Layout, header, styling |
Additional checkout fields API | Yes | No | PHP | New fields on blocks |
| No | Yes | PHP | Fields on the shortcode checkout |
Slot fills and inner blocks | Yes | No | JavaScript, build step | Plugin authors, rich components |
A field editor plugin | Check the vendor | Check the vendor | No | Owners who want a screen, not code |
A checkout plugin such as CartFlows | Check the vendor | Check the vendor | No | Replacing the whole flow, upsells, order bumps |
For the last two rows we are not stating compatibility, because it changes by version and vendor. Read each plugin’s own statement about the Checkout block before you buy or install, and test on staging. The official Checkout Field Editor documentation and the CartFlows page on WordPress.org are the places to start for those two.
Common mistakes people report
- Using the classic filter on the Checkout block. A snippet built on
woocommerce_checkout_fieldsdoes nothing on a block checkout. WooCommerce’s field documentation marks parts of that approach as shortcode-only and sends block users to the additional checkout fields API. - Expecting display hooks to print markup in the block. Hooks such as
woocommerce_after_order_notesbelong to the classic template. WooCommerce notes that its migrated hooks run on the server and that client-side blocks do not necessarily change because a server callback was added. See the migrated hooks page. - Hiding shipping fields with the old filter on blocks. A fix to a shipping bug (pull request 57674, May 2025) records the split: shortcode checkout still honours
woocommerce_shipping_fields, while the block checkout uses locale settings only. Hiding core fields works differently per checkout. - Choosing the wrong location for a business field. One open report (issue 64099, April 2026) says additional fields in the contact, address or order sections show in both the billing and the shipping address blocks on the admin order screen, which confuses owners who only wanted billing data. If a value belongs to the order, use the
orderlocation. - Registering the field too early. The documentation says to call the registration function on
woocommerce_initor later, because earlier calls can break initialization and translations. - Running a field editor plugin and custom code together. The classic-fields documentation warns that the Checkout Field Editor extension overrides custom field code. Pick one owner for your fields.
One more thing worth knowing: extension authors are still asking for better editor previews of custom fields. Issue 70244, opened in October 2026, asks for a supported way to update a field’s look in the Checkout block’s editor preview without reloading. So if your custom field looks different in the editor than on the live page, that is a known gap, not a mistake on your side.
What should I test after customizing checkout?
Run a real test order after every change, because checkout is where a small mistake costs money. Use a test payment method on staging, then check these in order:
- A guest order and a logged-in order, both completing.
- Every required field refusing an empty value, with a readable error.
- Your custom field value appearing on the order in the admin and in the order email if you display it there.
- The page at phone width, with the on-screen keyboard open on the last field.
- A coupon, a shipping change and a payment method change, each recalculating correctly.
We keep a shorter routine in the 10-minute checkout test, written for after WooCommerce updates but equally good after a customization. If you add address lookups to the form, our address autocomplete comparison covers the plugin options, and the confirmation email people see after paying is its own job: see our roundup of email customizer plugins. If payment methods are the thing you want to change, start with our payment gateway plugin comparison.
Where does our team fit?
We are a WooCommerce development team, so we are one option, and often not the cheapest one. If you need a VAT field, a reordered form and a restyled header, the code and steps above are enough for a competent site owner or any developer you already work with, and paying us for it would be a waste.
We are worth a call when the change touches money or data: a checkout that has to write to a CRM or ERP, field logic that depends on shipping zones or customer roles, a payment gateway that does not support the block, or a store with enough order volume that a failed test on production is expensive. You can reach us through woocustomdev.com. Whatever you decide, build and test on staging first.
FAQ
Can I customize the WooCommerce checkout page without a plugin?
Yes. The Site Editor handles layout and styling, the settings screens handle guest checkout and account creation, and a few lines of PHP add or reorder fields. Plugins are optional.
Why did my checkout field code stop working?
The usual cause is a mismatch between code and checkout type. A woocommerce_checkout_fields filter only affects the classic shortcode checkout. If your store is on the Checkout block, register fields with woocommerce_register_additional_checkout_field() instead.
Can I switch from the Checkout block back to the classic checkout?
Yes. Select the Checkout block, use Transform in the toolbar, choose Classic Shortcode and save. WooCommerce recommends doing the same for the Cart page.
Which field types can the block checkout use?
The documentation lists text, select, checkbox and date, and says more types are planned. Text is the default.
Where do custom block checkout field values end up?
In order meta. Address fields use _wc_billing/ and _wc_shipping/ prefixes, and contact and order fields use _wc_other/. The documentation recommends its helper methods over reading these keys directly.
Is it safe to edit checkout code on a live store?
No. A syntax error in a snippet can take checkout down, and a logic error can lose orders quietly. Use staging, keep the code in a plugin or child theme, and run a test order before and after.
Sources, all checked 14 November 2026: WooCommerce developer documentation on additional checkout fields, customising checkout fields and extensibility in blocks; the WooCommerce merchant guides linked above; the GitHub items linked in the mistakes box.
Plugins we build and run
We maintain these ourselves, which is why we can support them on your site.
- BuddyNextThe self-hosted community engine for WordPress
- BuddyXFree community theme, Pro when you outgrow it
- ReignPremium community theme. Add pieces, build anything
- JetonomyCommunity forum and Q&A for WordPress
- EventonomyEvents and RSVPs for WordPress communities
- LearnomyCourses and learning communities on WordPress
- ListoraDirectories and listings your members can browse
- SnipShareCode sharing built for developer communities
- WB Ad ManagerAd placements that turn traffic into revenue
- WP Career BoardA job board your community actually uses
- WP Sell ServicesSell services with offers, orders, and payouts
- MediaVersePhotos, video, and media albums for members
- WB GamificationPoints, badges, and rewards that keep members active
- Product RoadmapPublic roadmaps with voting your users trust