How to Automate Vendor Onboarding in WooCommerce Marketplaces with Verification Workflows
The WooCommerce seller onboarding process in five stages: application and approval, identity checks, payout setup, product review, shipping, tax and policies. Checked on Dokan, WCFM, WC Vendors and MultiVendorX, 15 Nov 2026.

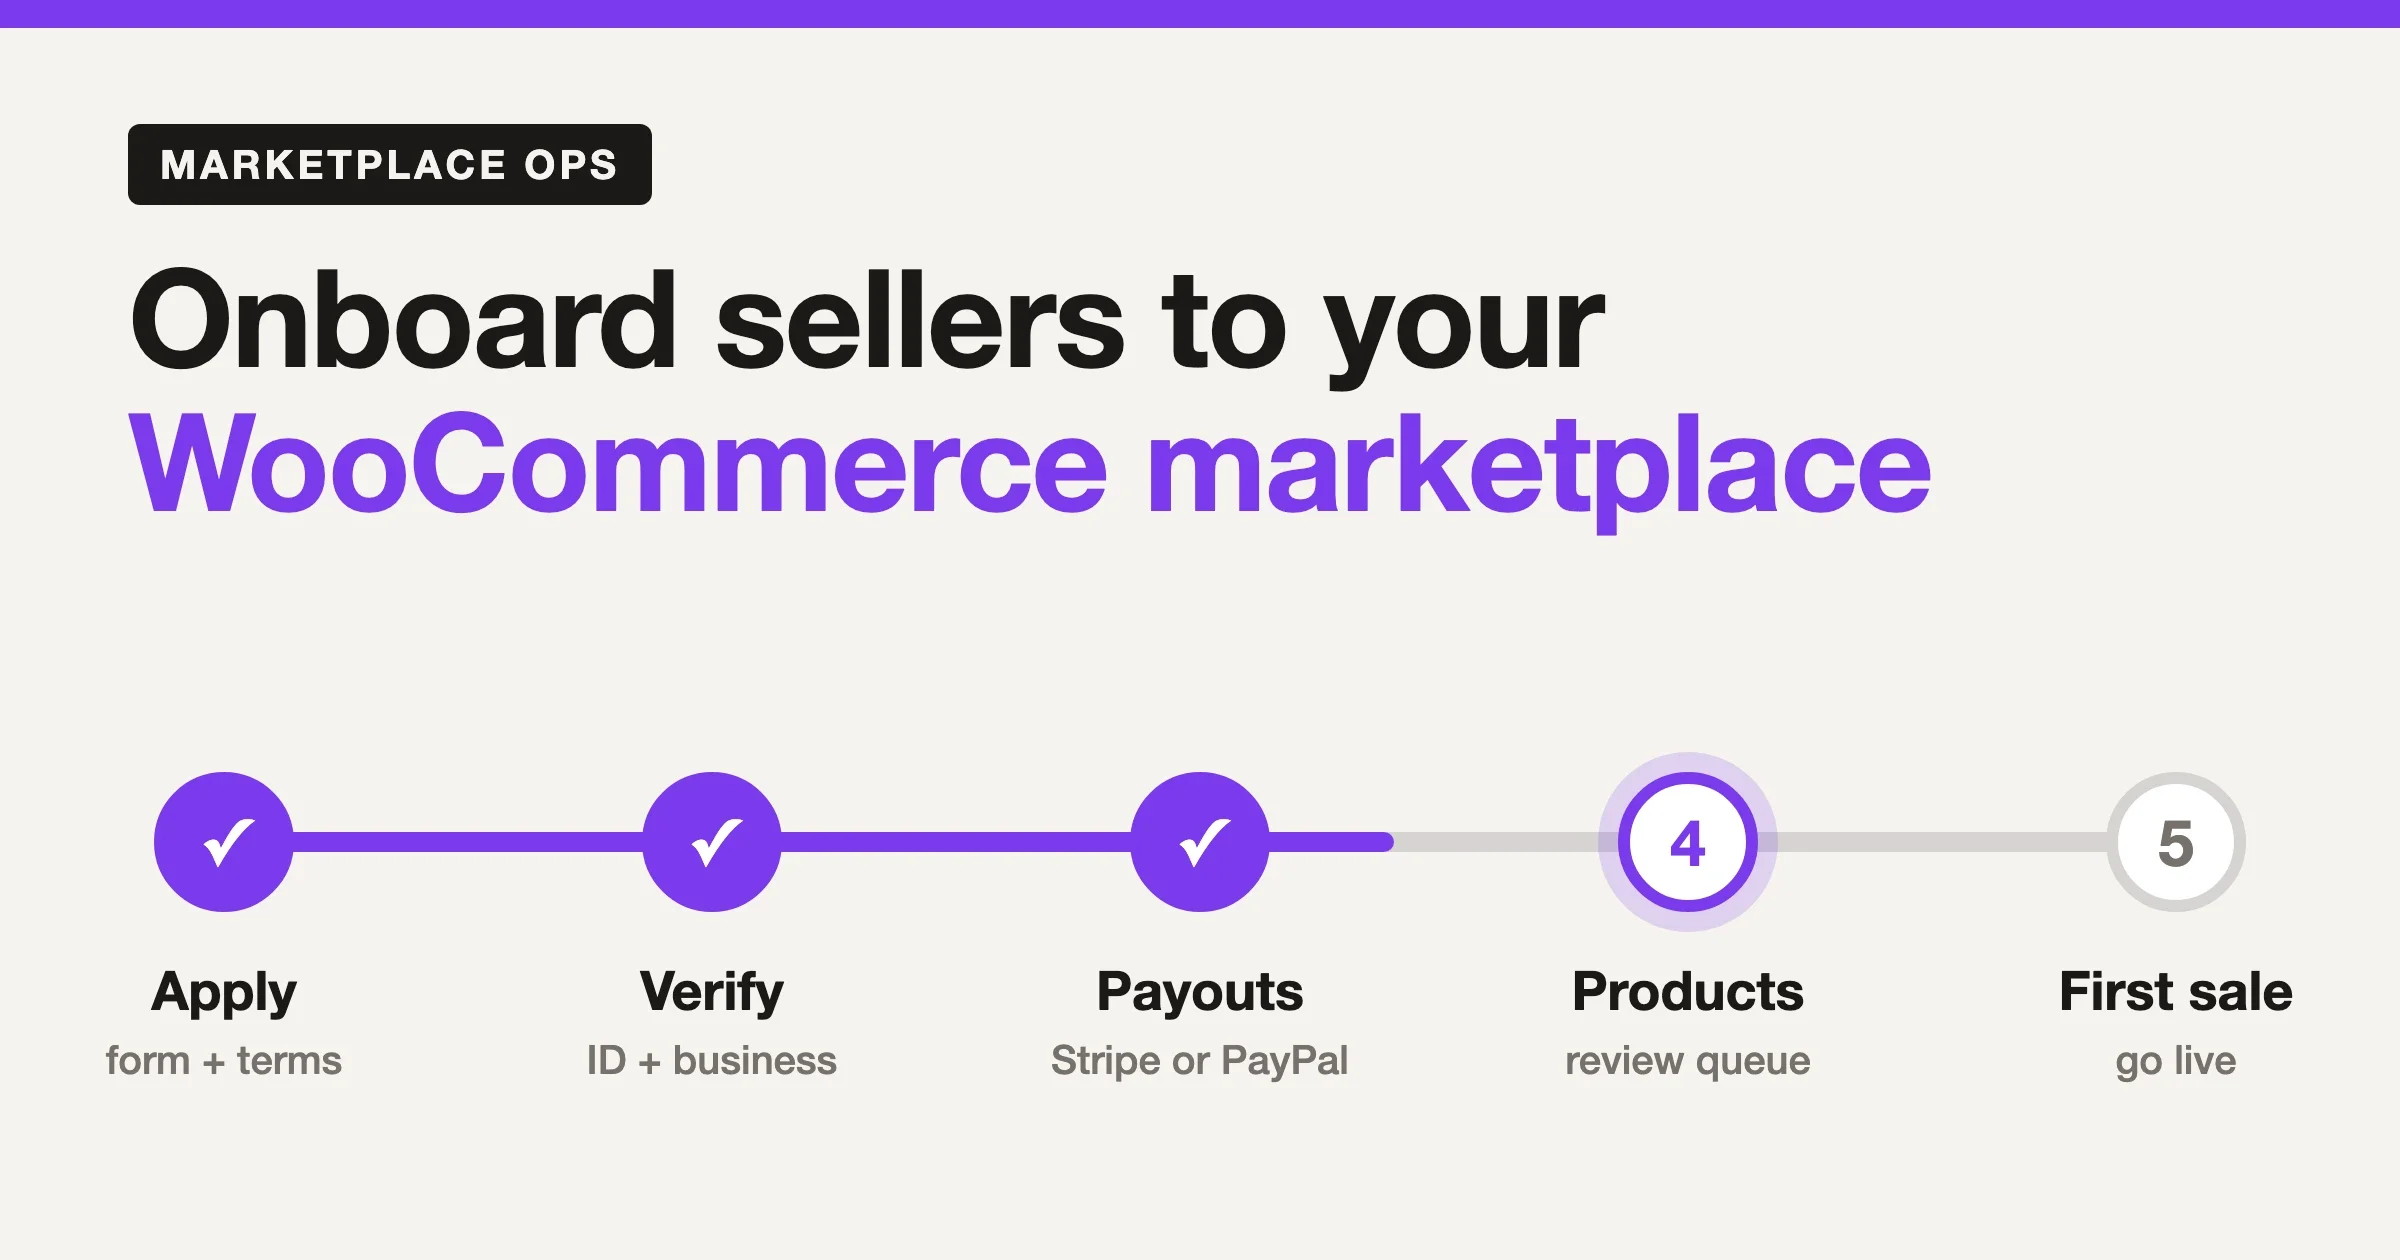
The WooCommerce seller onboarding process has five stages: the seller applies, you verify who they are, they connect a payout method, you review their first products, and they go live with their shipping, tax and policies set. Every marketplace plugin we checked covers the application and approval stages in its core settings, but identity checks and automatic payouts are usually paid features, so decide what you need before you pick a plugin. We checked Dokan, WCFM Marketplace, WC Vendors and MultiVendorX against WordPress.org, their own docs and Stripe’s docs on 15 November 2026.
Most people reach this page searching for “woocommerce seller onboarding process” or “woocommerce vendor onboarding”. Both searches describe the same problem: you have a marketplace, sellers are signing up, and you need a repeatable path from “applied” to “made their first sale” that does not eat your week. This guide is that path, in the order a real seller experiences it.
What is the WooCommerce seller onboarding process?
It is the sequence that turns a stranger into a seller you are comfortable putting in front of your customers. Skipping a stage does not remove the work, it moves it to support tickets, refund disputes and cleanup after a bad seller goes live. Here is the whole flow in one view.
- Apply. The seller fills in a registration form and accepts your marketplace terms.
- Verify. You confirm identity and, where it matters, the business behind the store.
- Payout setup. The seller connects Stripe, PayPal or a bank-transfer method so commissions can be paid.
- Product review. New listings wait in a queue until someone checks the first few.
- Go live. Shipping, tax, return policy and store profile are set, and the seller is told what happens after the first order.
Stages two and three are where marketplaces get hurt most. A seller who passes the application but never finishes payout setup is a support ticket in waiting, and a seller who sells before verification is a chargeback risk you cannot undo.
How do you set up WooCommerce vendor onboarding?
Start by choosing the plugin, because the plugin decides which of the five stages are built in and which you assemble yourself. The table below shows the public WordPress.org numbers for the four plugins this guide covers. Support figures are threads from the last two months as WordPress.org reports them, so treat small samples with care.
Plugin | Version and last update | Active installs | Rating | Support threads resolved |
|---|---|---|---|---|
Dokan (Dokan Lite) | 5.3.4, 5 Nov 2026 | 30,000+ | 4.6 of 5 (769 ratings) | 5 of 6 |
WCFM Marketplace | 3.8.4, 2 Nov 2026 | 10,000+ | 4.6 of 5 (449 ratings) | 0 of 1 |
WC Vendors | 2.7.3, 19 Oct 2026 | 3,000+ | 4.5 of 5 (188 ratings) | 0 of 1 |
MultiVendorX | 5.0.22, 10 Nov 2026 | 2,000+ | 4.8 of 5 (432 ratings) | 17 of 17 |
Source: the WordPress.org plugin API, queried on 15 November 2026. The rating is the API’s percentage converted to a five-star scale. Install counts are the rounded bands WordPress.org publishes, and none of these numbers tell you how good the paid versions are.
Before you build anything custom, read what the free plugin already does. The sections below walk each stage and show where each plugin stands. Your payout and shipping choices also depend on the marketplace plugin you pick, which our comparison of WooCommerce multivendor and marketplace plugins covers in more depth.
How do sellers apply and get approved?
Turn on manual approval for any marketplace that sells products with real risk, and keep the application form short. A long form loses good sellers, and a form with no approval step lets anyone sell. Each plugin names the setting differently.
Dokan
Dokan’s docs list an Enable Selling setting under Dokan, Settings, Selling Options. It lets you choose automatic approval after registration, manual approval by an admin, or selling limited to verified vendors. A separate New Vendor Product Upload checkbox controls whether newly registered vendors can add products at all, and Product Status sets new products to Pending Review or Published. Dokan’s newer admin screens move some of these settings, so confirm the path on your version.
WCFM Marketplace
WCFM’s docs put registration under WCFM Admin Dashboard, Settings, Vendor registration. The page has a Required Approval option where an admin approves each application, an Email verification option that sends a code before registration finishes, and a form with first name, last name, user name, store address and store phone. You can add a terms page and custom fields, a welcome email, and rejection rules with their own email. After approval the vendor gets a setup wizard for payment details and store policies, which they can skip and finish later. The same docs say the “Become a vendor” link depends on WCFM Membership being active, and that page dates from before the current release, so test it on staging.
WC Vendors
WC Vendors keeps it to checkboxes on WC Vendors, Settings, General: Vendor Registration, Vendor Registration Form and Vendor Approval. With approval on, applicants get a Pending Vendor role and cannot sell. You approve or deny them from Users, All Users, and the applicant’s submitted details show on their Edit User page. WooCommerce’s own “Allow customers to create an account on the My account page” setting must be on first. The vendor docs we read do not mention an applicant email in this flow, so plan your own.
MultiVendorX
MultiVendorX’s docs describe a customizable registration form placed on a page that holds the [vendor_registration] shortcode, with the “Vendor Registration” page preselected by default, and the plugin’s WordPress.org page lists a “Customizable Vendors Registration Form” and a setup wizard. We did not find a document that describes the approval steps, so check the settings on a staging site before you promise sellers a review window.
What identity and business checks should you run?
Run the lightest check that matches your risk, and let your payment provider do the legal identity work where it can. For a marketplace that sells handmade goods, an email check and a Stripe-verified account may be enough. For regulated goods, such as food or health products, you want a document review you can show later.
Stripe puts the Know Your Customer duty in plain terms: on a Connect platform, the platform collects the required details about the individual or company receiving funds and Stripe tries to verify them, sometimes asking for a government ID scan or proof of address. Stripe’s docs recommend Connect Onboarding, its hosted flow, so Stripe handles the changing country rules. They also say that even after Stripe verifies an account, you must still watch for fraud and should not rely on that check to meet any independent legal verification duty you have.
Then look at what your marketplace plugin adds on top.
- Dokan: a Vendor Verification module, switched on under Dokan, Modules, with settings under Dokan, Settings, Verification. ID and address checks need manual approval from an admin at Dokan, Verifications, where you can approve, reject or add a note. Company verification takes uploaded files, and you can add custom methods. Check which Dokan plan includes the module before you budget for it.
- WCFM: vendor verification with identity proof, address proof and social verification, an option to cap how many products an unverified vendor can upload, and a verified-store badge. WCFM’s own article lists WCFM Ultimate as a requirement, and it dates from January 2021, so confirm the current licence on their site.
- WC Vendors and MultiVendorX: we did not find a built-in document-verification module in either plugin’s own pages. Use your payment provider’s checks plus a manual review, or a general form plugin with file upload.
A common middle path is to let sellers register and set up a store, but hold their listings in review until they connect a verified payout account. That keeps the application friendly and puts the real check at the point where money moves.
How do vendors set up payouts?
Pick the payout method before you open applications, because it decides who carries refund and dispute risk. Stripe Connect splits money at checkout and pays sellers on a schedule. PayPal’s multiparty platform lets a platform take a partner commission on each transaction. Bank transfer is the simplest and also the most manual for you.
Stripe Connect
Dokan’s docs describe two Stripe modules. The Stripe Express module is switched on under Dokan, Modules, you enter your Stripe keys under WooCommerce, Settings, Payments, and vendors connect from their dashboard through Stripe’s hosted onboarding. There is an option to show a notice to vendors who have not connected yet, which is useful when you chase half-finished sellers. The older Stripe Connect module has vendors press a Connect with Stripe button under Settings, Payment. Make sure you follow the guide for the module you actually run. Our walkthrough of WooCommerce split payments with Stripe Connect covers account types and the payment maths.
WCFM’s WordPress.org page lists automated Stripe Split Pay, and PayPal Direct Pay with the Marketplace API, PayFast, PayStack, MangoPay, Skrill, bank transfer and cash as payout options. WC Vendors lists automatic commission payment with Stripe among its Pro features, and its Stripe Connect guide says the add-on needs a Pro plan. That guide describes three payout modes, automatic, scheduled and manual, and says order status and shipping do not change when the money is sent.
PayPal and bank transfer
PayPal lists seller onboarding, partner fees and payouts as features of its multiparty payments product, and says partner fees settle daily to the bank account linked to the partner’s PayPal account. MultiVendorX’s WordPress.org page lists PayPal, Stripe, bank transfer and cash on delivery as gateways, and marks real-time vendor payment through Stripe and PayPal as a Pro feature. Bank transfer works in every plugin we looked at, but you carry the admin time of every payout run, so set a minimum threshold and a fixed payout day.
Two decisions belong in your seller terms, not in a settings screen. First, when does a seller get paid: at order completion, after a holding period, or after the return window closes? Second, who pays when a refund or dispute arrives after the money has moved? One Dokan forum user described exactly this gap, noting that the withdrawal threshold did not apply to Stripe Connect payouts. We list the thread in the mistakes box below.
How should product approval work?
Review every new seller’s first listings, then relax. A queue that checks the first three to five products from each seller catches most problems, and it keeps your team’s time on sellers who have not earned trust yet.
- In Dokan, set Product Status to Pending Review under Selling Options. A support reply on a September 2026 forum thread said admin approval is the default for vendor products in Dokan Lite, so confirm what your install does before relying on it.
- In WCFM, vendor capabilities control whether a vendor can publish, and in a 2020 forum reply their support suggested turning publishing off so products stay pending until an admin approves them.
- In WC Vendors, the free version publishes products through WordPress admin, and the Pro version adds full front-end product management.
If you want your team alerted when a product enters the queue, a small core-WordPress snippet does it. It uses the transition_post_status hook that ships with WordPress, so it works with any of the four plugins that store products as WooCommerce products.
// Uses only the WordPress core transition_post_status hook.
// Not run on a live marketplace: test on staging first, it emails every time any product enters Pending.
add_action( 'transition_post_status', function ( $new, $old, $post ) {
	if ( 'product' !== $post->post_type || 'pending' !== $new || 'pending' === $old ) {
		return;
	}
	wp_mail(
		get_option( 'admin_email' ),
		'Product waiting for review: ' . $post->post_title,
		admin_url( 'post.php?post=' . $post->ID . '&action=edit' )
	);
}, 10, 3 );
That sends one plain email per product. On a busy marketplace, send a daily digest instead, because one email per listing turns into noise past a few dozen sellers.
What shipping and tax settings does each vendor need?
Every seller needs a shipping origin, at least one shipping zone with a rate, and a clear statement of where they will not ship. Tax needs one decision from you as the marketplace owner, taken with your accountant, because the rules depend on your country and on who is the seller of record.
On shipping, MultiVendorX’s WordPress.org page lists shipping rates by zone, country, distance and weight, with weight rules and per-product shipping in Pro. WCFM lists advanced vendor shipping and logistics, and WC Vendors lists advanced shipping management among its Pro features. Our guide to vendor-specific shipping rules and zones goes through the setup.
On tax, we did not verify per-vendor tax handling in all four plugins, and we will not guess. MultiVendorX lists “Tax and Invoicing” as a Pro feature. For the others, check whether your plugin lets a seller enter a tax number and whether WooCommerce’s store-wide tax settings are enough for how you sell. If sellers are the legal seller of record in their country, ask an accountant before you launch, not after the first tax filing.
Which policies should sellers accept?
Get a written yes to your marketplace terms during registration, and keep the version they accepted. WCFM’s registration page has a terms setting with a page dropdown. For the other plugins, check your version for a terms checkbox, and where a plugin does not store the acceptance date, add a field for it.
Your seller terms should say, in plain words:
- your commission and when it changes
- when and how sellers get paid, and who bears refunds and disputes
- how fast a seller must ship and reply to buyers
- which products are banned or need documents
- what happens to a seller’s balance if you suspend the account
Fraud and chargeback handling belongs in these terms too. Our list of WooCommerce anti-fraud plugins helps you choose tooling, but the policy comes first: a tool cannot decide who pays.
What is the first-sale checklist?
Give a new seller this list and tick it yourself before you switch them live. Most marketplace support tickets in the first month trace back to one of these items.
- Application approved and terms accepted, with the acceptance date saved
- Identity or business check passed to the level you set for your marketplace
- Payout method connected, and a small test payout or test-mode split confirmed
- Store name, logo, description, and support contact filled in
- Shipping origin, zones and rates saved, with a test order priced correctly
- Return and refund policy shown on the store page
- First three products reviewed and published
- Seller knows how orders reach them, how to mark them shipped, and who to contact
- A coupon test checked, so the seller’s commission matches what you promised
Seller-facing screens matter here too. A seller who cannot find the orders list will message you. If your plugin’s default dashboard does not fit, building a custom vendor dashboard is a bigger project, so try the plugin’s own templates first.
Common mistakes people report
These come from public forum threads we read on 15 November 2026. We paraphrase them, link each one, and give the date the thread shows. They are single reports, not proof of a bug in every install, so use them as test cases for your own staging site.
- Assuming product review is switched on. A Dokan Lite user asked in September 2026 where to require admin approval for every new vendor product and whether Pending Review was the default. Support replied that admin approval is the default for vendor products, without naming the setting. Check your Product Status setting yourself. Dokan forum thread.
- Updating payment code on a live marketplace. One user reported that after updating Dokan Pro from 5.0.16 to 5.3.2 on 15 October 2026, Stripe Connect stopped creating vendor transfers while customers were still charged. They rolled back and paid vendors by hand. The thread has no official confirmation of a bug or a fix. Test payouts on staging after every update and keep a rollback path. Dokan forum thread.
- No plan for refunds after payout. A Dokan Pro user said vendors are paid when orders complete, the withdrawal threshold does not apply to Stripe Connect, and the marketplace absorbs refunds and disputes. Set a holding period or a clear liability rule in your seller terms. Dokan forum thread, around November 2026.
- Approval that blocks store setup. In a May 2020 WCFM thread, a site owner found that Required Approval stopped vendors from starting store setup until an admin approved them, and worked around it with a short form and capability groups. The thread is old, so check current behavior, but the design question still applies: do you want sellers to prepare while they wait? WCFM forum thread.
- A second approval switch you forgot. In a January 2020 thread, new WCFM applicants landed on an “application under review” page even though registration approval was off, because each membership plan has its own Required Approval setting. Audit every layer that can hold a seller back. WCFM forum thread.
- Not testing commission with a coupon. A WC Vendors user reported that a 50 percent commission on a discounted order showed 50 dollars to the vendor instead of 25. The reply said the result depends on a premium Coupon Action setting. Run a coupon test before you quote commission figures to sellers. WC Vendors forum thread.
Recent reviews of Dokan Lite on WordPress.org also repeat two themes, praise for the marketplace features and complaints about bugs and slow support. Read the review page yourself before you commit, because sample sizes per month are small.
Which plugin fits which marketplace?
Pick by the onboarding stage you cannot afford to build yourself. This table sums up what we confirmed, and “not found” means we did not see it in the plugin’s own pages, so ask the vendor before you buy.
Need | Dokan | WCFM Marketplace | WC Vendors | MultiVendorX |
|---|---|---|---|---|
Manual vendor approval | Enable Selling setting | Required Approval | Vendor Approval checkbox | Not found in docs |
Registration form | Yes | Yes, with custom fields | Vendor Registration Form | Shortcode page, customizable |
Identity or document check | Vendor Verification module | Verification, needs WCFM Ultimate per docs | Not found | Not found |
Stripe payouts | Stripe modules | Stripe Split Pay listed | Pro Stripe Connect add-on | Pro, real-time Stripe and PayPal |
Product review queue | Product Status setting | Capability settings | Admin publishes in free version | Not found in docs |
Our suggestion. For a marketplace that needs identity checks and Stripe payouts without custom work, Dokan or WCFM is the shorter path, with the caveat that both put key features in paid tiers, so price the full stack first. For a small marketplace that mostly needs approval and manual payouts, WC Vendors’ free checkboxes are enough to start. MultiVendorX has the strongest recent support-thread record in the WordPress.org figures above, but we could not confirm its approval and verification steps, so test them before you commit. If none of these fit your onboarding rules, that is custom development work, and our team builds that kind of workflow on top of whichever plugin you choose.
Frequently asked questions
How long should seller approval take?
Tell sellers a number you can keep, such as two business days, and put it on the application page and in the confirmation email. A seller who hears nothing for a week usually gives up.
Do I need KYC for every seller?
It depends on your country, your products and your payment provider. If you use Stripe Connect, Stripe collects and verifies account details as part of onboarding, but Stripe’s docs say that does not replace any legal verification duty you have independently. Ask your legal adviser what applies to you.
Can sellers set up a store before they are approved?
It depends on the plugin and its settings. The WCFM and WC Vendors docs we read describe pending sellers who cannot use vendor tools until approved, while a Dokan forum answer suggests restricting product upload instead of blocking dashboard access. Test the exact behavior on staging.
What happens if a seller never finishes payout setup?
Their sales either cannot be split or sit unpaid, depending on the gateway. Keep their listings in review until payout setup is done, and use a dashboard notice or reminder email to chase them. Dokan’s Stripe Express docs mention a notice for vendors who have not connected.
Should I review every product from every seller?
Review the first few from each new seller, then switch trusted sellers to publish directly. Keep a way to move a seller back to review if complaints arrive.
Facts about plugin settings, versions and install counts were checked on 15 November 2026. Settings screens change between versions, so confirm paths on your own install before you write them into seller guides.
Related reading
- 11 Best WooCommerce Multivendor/Marketplace Plugins for 2026
- How to Implement Split Payments in WooCommerce Marketplaces Using Stripe Connect
- How to Add Vendor-Specific Shipping Rules and Zones in WooCommerce Marketplaces
- How to Build Custom Vendor Dashboards in WooCommerce for a Professional Marketplace
- 5 Best WooCommerce Anti-Fraud Plugins for 2026
Plugins we build and run
We maintain these ourselves, which is why we can support them on your site.
- BuddyNextThe self-hosted community engine for WordPress
- BuddyXFree community theme, Pro when you outgrow it
- ReignPremium community theme. Add pieces, build anything
- JetonomyCommunity forum and Q&A for WordPress
- EventonomyEvents and RSVPs for WordPress communities
- LearnomyCourses and learning communities on WordPress
- ListoraDirectories and listings your members can browse
- SnipShareCode sharing built for developer communities
- WB Ad ManagerAd placements that turn traffic into revenue
- WP Career BoardA job board your community actually uses
- WP Sell ServicesSell services with offers, orders, and payouts
- MediaVersePhotos, video, and media albums for members
- WB GamificationPoints, badges, and rewards that keep members active
- Product RoadmapPublic roadmaps with voting your users trust