How to Build Custom Vendor Dashboards in WooCommerce for a Professional Marketplace

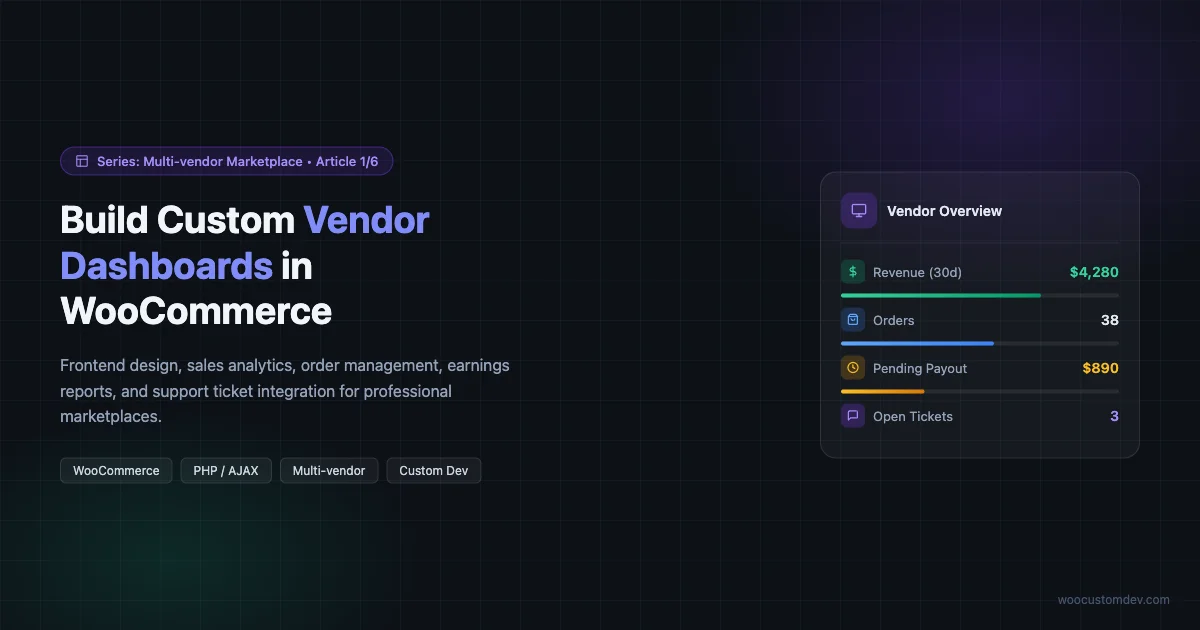
Running a multi-vendor marketplace on WooCommerce gives you flexibility that hosted platforms can’t match. But the default vendor experience is bare-bones. Your sellers get a clunky My Account page with no real analytics, no order management, and no way to track their earnings without digging through admin screens they shouldn’t even see.
A custom vendor dashboard changes that entirely. When vendors can see their sales at a glance, manage orders from a clean interface, and pull their own earnings reports, they spend less time emailing you with questions and more time listing products. That’s good for everyone.
This guide walks through the full build: planning the dashboard architecture, handling frontend output, wiring up AJAX for live data, and integrating support tickets. Whether you’re building on top of a plugin like WC Vendors or Dokan, or rolling something fully custom, the patterns here apply. Before diving in, it helps to understand whether a custom WooCommerce build is the right call for your marketplace vs an off-the-shelf platform.
Why the Default WooCommerce Experience Falls Short for Vendors
WooCommerce was built for single-store owners. When you layer in multi-vendor functionality, vendors get access to a slice of the My Account area, but it’s not purpose-built for their workflow. Common friction points include:
- No aggregated sales view. Vendors can see individual orders but not their total revenue for a period.
- Order management is mixed with the main store. There’s no filtering by vendor without extra queries.
- Product CRUD is buried inside WP Admin, which exposes navigation and settings you’d rather keep hidden.
- Earnings and payout history requires admin access or a plugin that adds it awkwardly to My Account.
- Support requests land in your helpdesk but vendors have no visibility into their own tickets.
A purpose-built dashboard solves all of this. You control exactly what vendors see and how data is presented, without giving them admin access.
Planning the Dashboard Architecture
Before writing a line of code, map out the vendor journey. What does a vendor do every day? In most marketplaces, the daily workflow looks like this:
- Check new orders and update fulfillment status
- Review recent sales and compare against last week
- Add or edit product listings
- Check pending payout amounts
- Respond to customer questions via support
Your dashboard architecture should mirror this flow. The primary navigation should have five areas: Overview, Orders, Products, Earnings, and Support. The overview is the landing screen. Everything else is a dedicated section.
Page Structure and URL Routing
You have two routing approaches: shortcode-based pages with query string navigation, or a single-page approach with AJAX tab switching. For most marketplaces, tab switching on a single page works better. It’s faster, the vendor never loses their scroll position, and you can update the URL hash for bookmarkability.
Create a WooCommerce page called Vendor Dashboard and assign it a shortcode. The shortcode renders a wrapper div and enqueues your JavaScript. From there, JavaScript handles showing and hiding sections based on the active tab.
function vendor_dashboard_shortcode() {
    if ( ! is_user_logged_in() ) {
        return 'Please log in to access your dashboard.


';
    }

    $vendor_id = get_current_user_id();
    if ( ! vendor_is_approved( $vendor_id ) ) {
        return '


Your vendor account is pending approval.


';
    }

    ob_start();
    include plugin_dir_path( __FILE__ ) . 'templates/dashboard-shell.php';
    return ob_get_clean();
}
add_shortcode( 'vendor_dashboard', 'vendor_dashboard_shortcode' );
Building the Overview: Sales Analytics Widget
The overview screen should answer two questions at a glance: how much did I make recently, and what’s happening with my orders right now? A stat bar at the top with four numbers handles the first question. An order status breakdown handles the second.
Stat Bar: Revenue, Orders, Average Order Value, Pending Payouts
Pull vendor-specific sales data using WooCommerce’s order query functions. Group orders by the vendor’s product IDs and sum the relevant line items.
function get_vendor_stats( $vendor_id, $period = '30d' ) {
    $date_from = date( 'Y-m-d', strtotime( '-30 days' ) );
    if ( $period === '7d' ) {
        $date_from = date( 'Y-m-d', strtotime( '-7 days' ) );
    }

    $product_ids = get_posts( [
        'post_type'      => 'product',
        'author'         => $vendor_id,
        'fields'         => 'ids',
        'posts_per_page' => -1,
    ] );

    if ( empty( $product_ids ) ) {
        return [ 'revenue' => 0, 'orders' => 0, 'aov' => 0, 'pending_payout' => 0 ];
    }

    $order_ids = wc_get_orders( [
        'status'     => [ 'wc-completed', 'wc-processing' ],
        'date_after' => $date_from,
        'return'     => 'ids',
        'limit'      => -1,
    ] );

    $revenue     = 0;
    $order_count = 0;

    foreach ( $order_ids as $order_id ) {
        $order    = wc_get_order( $order_id );
        $subtotal = 0;

        foreach ( $order->get_items() as $item ) {
            if ( in_array( $item->get_product_id(), $product_ids ) ) {
                $subtotal += $item->get_subtotal();
            }
        }

        if ( $subtotal > 0 ) {
            $revenue += $subtotal;
            $order_count++;
        }
    }

    return [
        'revenue'        => $revenue,
        'orders'         => $order_count,
        'aov'            => $order_count > 0 ? $revenue / $order_count : 0,
        'pending_payout' => get_vendor_pending_payout( $vendor_id ),
    ];
}
Revenue Chart
A simple bar or line chart showing daily revenue for the selected period adds a lot of perceived value. Use a lightweight library like Chart.js. Pass the data as a localized JavaScript object from your AJAX handler, then render it in a canvas element.
wp_localize_script( 'vendor-dashboard', 'vendorDashData', [
    'ajaxUrl'  => admin_url( 'admin-ajax.php' ),
    'nonce'    => wp_create_nonce( 'vendor_dashboard_nonce' ),
    'vendorId' => get_current_user_id(),
] );
Order Management Interface
The orders section needs to show vendors their orders without exposing the WP Admin order screen. Build a filtered table that pulls only orders containing the vendor’s products.
Order Table with Filtering
The table should show: order number, customer name (first name only for privacy), order date, items, total for vendor, and status. Add filter controls for status (all / processing / completed / refunded) and a date range picker.
function vendor_get_orders_ajax() {
    check_ajax_referer( 'vendor_dashboard_nonce', 'nonce' );

    $vendor_id  = get_current_user_id();
    $status     = sanitize_text_field( $_POST['status'] ?? 'any' );
    $date_from  = sanitize_text_field( $_POST['date_from'] ?? '' );
    $date_to    = sanitize_text_field( $_POST['date_to'] ?? '' );
    $paged      = absint( $_POST['paged'] ?? 1 );

    $product_ids = get_posts( [
        'post_type'      => 'product',
        'author'         => $vendor_id,
        'fields'         => 'ids',
        'posts_per_page' => -1,
    ] );

    $args = [
        'limit'  => 20,
        'paged'  => $paged,
        'return' => 'ids',
    ];

    if ( $status !== 'any' ) {
        $args['status'] = 'wc-' . $status;
    }
    if ( $date_from ) {
        $args['date_after'] = $date_from;
    }
    if ( $date_to ) {
        $args['date_before'] = $date_to;
    }

    $all_order_ids = wc_get_orders( $args );
    $vendor_orders = [];

    foreach ( $all_order_ids as $order_id ) {
        $order = wc_get_order( $order_id );
        foreach ( $order->get_items() as $item ) {
            if ( in_array( $item->get_product_id(), $product_ids ) ) {
                $vendor_orders[] = $order;
                break;
            }
        }
    }

    ob_start();
    foreach ( $vendor_orders as $order ) {
        include plugin_dir_path( __FILE__ ) . 'templates/order-row.php';
    }
    $html = ob_get_clean();

    wp_send_json_success( [ 'html' => $html ] );
}
add_action( 'wp_ajax_vendor_get_orders', 'vendor_get_orders_ajax' );
Order Status Updates
Decide upfront which status transitions vendors can make. In most marketplaces, vendors can mark orders as shipped (transition to completed) but cannot process refunds. Scope the AJAX handler tightly and validate the allowed transitions server-side.
function vendor_update_order_status_ajax() {
    check_ajax_referer( 'vendor_dashboard_nonce', 'nonce' );

    $vendor_id  = get_current_user_id();
    $order_id   = absint( $_POST['order_id'] );
    $new_status = sanitize_text_field( $_POST['new_status'] );

    $allowed = [ 'completed' ];
    if ( ! in_array( $new_status, $allowed ) ) {
        wp_send_json_error( 'Status transition not allowed.' );
    }

    $order = wc_get_order( $order_id );
    if ( ! vendor_owns_order( $vendor_id, $order ) ) {
        wp_send_json_error( 'Order not found.' );
    }

    $order->update_status( $new_status );
    wp_send_json_success( [ 'message' => 'Order updated.' ] );
}
add_action( 'wp_ajax_vendor_update_order_status', 'vendor_update_order_status_ajax' );
Product CRUD in the Frontend Dashboard
Getting product management right is the hardest part of a custom dashboard. You have two realistic options: use the WP Admin product editor in a restricted role, or build a frontend form. The right choice depends on product complexity.
Option 1: Restricted Admin with Role Caps
Assign vendors a custom role with only the capabilities they need. Strip the admin menu down to Products only using the admin_menu action. This is faster to build and gets you the full product editor, including variable products, without rebuilding it.
add_action( 'admin_menu', function() {
    if ( ! current_user_can( 'manage_vendor_products' ) ) {
        return;
    }
    remove_menu_page( 'index.php' );
    remove_menu_page( 'edit.php' );
    remove_menu_page( 'upload.php' );
    remove_menu_page( 'edit-comments.php' );
    remove_menu_page( 'tools.php' );
    remove_menu_page( 'options-general.php' );
    remove_menu_page( 'woocommerce' );
} );
Filter the product list to show only the vendor’s own products using pre_get_posts. This prevents one vendor from seeing or editing another vendor’s listings.
Option 2: Frontend Product Form
For simpler products (no variations, limited attributes), a frontend form gives you full control over the UX. Use ACF or a custom meta form to handle product fields. Submit via AJAX, validate server-side, and use wp_insert_post and WooCommerce product meta functions to save the data.
function vendor_save_product_ajax() {
    check_ajax_referer( 'vendor_dashboard_nonce', 'nonce' );

    $vendor_id   = get_current_user_id();
    $product_id  = absint( $_POST['product_id'] ?? 0 );
    $title       = sanitize_text_field( $_POST['title'] );
    $price       = floatval( $_POST['price'] );
    $description = wp_kses_post( $_POST['description'] );

    if ( $product_id > 0 ) {
        $product = wc_get_product( $product_id );
        if ( ! $product || $product->get_post_data()->post_author != $vendor_id ) {
            wp_send_json_error( 'Product not found.' );
        }
    }

    $post_data = [
        'ID'           => $product_id > 0 ? $product_id : 0,
        'post_title'   => $title,
        'post_content' => $description,
        'post_status'  => 'pending',
        'post_type'    => 'product',
        'post_author'  => $vendor_id,
    ];

    $saved_id = wp_insert_post( $post_data );

    if ( ! $saved_id || is_wp_error( $saved_id ) ) {
        wp_send_json_error( 'Could not save product.' );
    }

    update_post_meta( $saved_id, '_price', $price );
    update_post_meta( $saved_id, '_regular_price', $price );
    wp_set_object_terms( $saved_id, 'simple', 'product_type' );

    wp_send_json_success( [ 'product_id' => $saved_id ] );
}
add_action( 'wp_ajax_vendor_save_product', 'vendor_save_product_ajax' );
Setting new products to pending status means they go through an admin review before going live. This is standard practice for most marketplaces and prevents low-quality listings from publishing automatically.
Earnings Reports and Payout Tracking
Vendors need to know two things about money: what they’ve earned in a given period, and when they’ll get paid. Build the earnings screen around these two pieces of information.
Earnings Calculation
Your commission structure determines how earnings are calculated. A typical setup stores the commission rate on the vendor’s user meta and applies it to each line item total. Store earnings per order in a custom table or as post meta on the order for fast lookup.
function calculate_vendor_earnings_for_order( $order_id, $vendor_id ) {
    $order           = wc_get_order( $order_id );
    $commission_rate = get_user_meta( $vendor_id, 'vendor_commission_rate', true );
    $commission_rate = $commission_rate ? floatval( $commission_rate ) : 0.8;

    $product_ids = get_posts( [
        'post_type'      => 'product',
        'author'         => $vendor_id,
        'fields'         => 'ids',
        'posts_per_page' => -1,
    ] );

    $gross   = 0;
    $earning = 0;

    foreach ( $order->get_items() as $item ) {
        if ( in_array( $item->get_product_id(), $product_ids ) ) {
            $gross   += $item->get_subtotal();
            $earning += $item->get_subtotal() * $commission_rate;
        }
    }

    return [
        'gross'    => $gross,
        'earning'  => $earning,
        'platform' => $gross - $earning,
    ];
}
Payout History Table
Store payouts in a custom database table with columns for vendor ID, amount, payment method, transaction reference, date, and status. Display this as a paginated table in the Earnings section with a running balance.
The most useful view combines pending earnings (orders completed but not yet paid out) and payout history in a single screen. This connects to how you structure WooCommerce tiered pricing and ordering rules at the product level.
Support Ticket Integration
When customers contact support about an order that involves a vendor’s product, that vendor should have visibility into the conversation and the ability to add information. There are two levels of integration: read-only visibility and active participation.
Read-Only Ticket Visibility
At minimum, vendors should see open support requests related to their orders. Pull tickets from your helpdesk (Zendesk, Freshdesk, or a WordPress-native solution like Awesome Support) filtered by order IDs that include the vendor’s products.
function vendor_get_support_tickets( $vendor_id ) {
    $cache_key = 'vendor_tickets_' . $vendor_id;
    $cached    = get_transient( $cache_key );

    if ( $cached !== false ) {
        return $cached;
    }

    $tickets = get_posts( [
        'post_type'  => 'ticket',
        'meta_query' => [
            [
                'key'   => '_ticket_vendor_id',
                'value' => $vendor_id,
            ],
        ],
        'post_status'    => [ 'publish', 'open' ],
        'posts_per_page' => 20,
    ] );

    set_transient( $cache_key, $tickets, 5 * MINUTE_IN_SECONDS );

    return $tickets;
}
Vendor Replies on Tickets
Allowing vendors to add private notes on tickets speeds up resolution significantly. A short textarea form that posts to an AJAX handler and adds an internal note to the ticket is enough.
Security Considerations for the Vendor Dashboard
Every AJAX endpoint in the vendor dashboard must verify: the request has a valid nonce, the current user is logged in with the vendor role, and the resource being accessed belongs to this vendor.
Never trust the vendor ID coming from the frontend. Always use get_current_user_id() server-side. Rate limit sensitive endpoints like the status update handler:
function vendor_check_rate_limit( $user_id, $action, $limit = 5 ) {
    $key   = 'rate_' . $action . '_' . $user_id;
    $count = (int) get_transient( $key );

    if ( $count >= $limit ) {
        return false;
    }

    set_transient( $key, $count + 1, MINUTE_IN_SECONDS );
    return true;
}
Performance Optimization for Vendor Data
Vendor dashboards can get slow quickly if you’re querying orders on every page load. The WooCommerce performance checklist covers caching and query optimization techniques that apply directly to the vendor data layer. A few patterns keep things fast.
Cache Stat Calculations
Store the 30-day revenue total in a transient keyed by vendor ID and date. Expire it every hour or invalidate it when a new order is placed via the woocommerce_order_status_completed hook.
Use a Dedicated Earnings Table
Store pre-calculated earnings per order in a custom table (wp_vendor_earnings) with a row per vendor per order. Sum the table instead of reprocessing orders. This is the same pattern used by WC Vendors and Dokan under the hood.
Paginate Everything
Orders, products, and tickets should all be paginated with 20 records per page. Never query all records for a vendor in a single request.
Vendor Onboarding: Setting Up the Application Flow
Before a vendor can access the dashboard, they need to apply and get approved. This is worth building properly from the start because it sets the tone for the whole vendor relationship and gives you a clean audit trail if issues arise later.
The application flow typically has three steps: submission, review, and approval notification. Keep the form short at the submission stage. Ask for business name, contact email, a brief description of what they sell, and whether they have existing inventory. You can collect tax and payment details after approval.
Storing Application Data
Store the application as a custom post type (vendor_application) with the applicant’s user ID attached as post meta. This way, approving a vendor is a simple status change on the post, and you get a full history of all applications including rejected ones.
When an admin approves the application, run a hook that assigns the vendor role to the user and sends a welcome email with their dashboard URL. The entire approval process can live in a metabox on the application post type without touching WooCommerce core.
Mobile Considerations for Vendor Dashboards
A significant number of marketplace vendors check their dashboards on mobile. If your stat bar is a flex row of four cards on desktop, it needs to collapse to a 2×2 grid on screens under 640px. The order table needs to either scroll horizontally or collapse to a card-based layout per order on small screens.
The most common mistake with vendor dashboard mobile design is treating it as a desktop-first feature and adding a media query as an afterthought. Build the mobile layout at the same time as the desktop layout. Vendor satisfaction with a marketplace correlates strongly with how well the dashboard works on their phone.
Progressive Enhancement for AJAX Sections
On slow connections, AJAX-heavy dashboards feel broken. Add loading states to each section. When a vendor clicks a tab, show a skeleton placeholder immediately and replace it when the data arrives. A spinner on its own is less reassuring than a skeleton that shows the shape of the content about to appear.
Dashboard Shell Template and Testing
The dashboard shell template ties everything together. It renders the navigation, the active section, and handles JavaScript initialization. Keep it lean and let each section load its own data via AJAX.
<div class="vendor-dashboard" data-vendor-id="<?php echo esc_attr( get_current_user_id() ); ?>">
    <nav class="vendor-dashboard__nav">
        <a href="#overview" class="active">Overview</a>
        <a href="#orders">Orders</a>
        <a href="#products">Products</a>
        <a href="#earnings">Earnings</a>
        <a href="#support">Support</a>
    </nav>
    <div class="vendor-dashboard__content">
        <div id="vendor-section" class="vendor-section">
            <!-- Content loads here via AJAX -->
        </div>
    </div>
</div>
Before rolling out to real vendors, test these scenarios: create two vendor accounts and verify each sees only their own data, test the order status update endpoint with a forged order ID, place a test order and verify the earnings calculation is correct, and confirm the rate limiter blocks more than five requests per minute.
Pre-Launch Checklist for Your Vendor Dashboard
Once the dashboard is built and passing basic tests, run through this list before giving vendors access:
- Role isolation: Log in as a vendor and confirm you cannot see any other vendor’s orders, products, or earnings. Try accessing admin URLs directly.
- Nonce verification: Remove the nonce from an AJAX request and confirm the handler rejects it with a 403 response.
- Ownership checks: Pass an order ID belonging to a different vendor and confirm the status update fails.
- Empty state handling: Log in as a brand-new vendor with no orders or products. Verify each section shows a helpful empty state rather than a blank screen or PHP warning.
- Rate limiting: Send six rapid requests to the status update endpoint and confirm the sixth is rejected.
- Mobile layout: View the dashboard at 390px viewport width. Confirm the stat bar, order table, and navigation are all usable without horizontal scrolling.
- Earnings accuracy: Place a test order, complete it, and confirm the vendor’s earnings calculation matches the expected commission amount.
- Payout record: Simulate a payout and confirm the entry appears in the vendor’s payout history with the correct amount and date.
Next Steps in This Series
This article covers the core dashboard architecture. The next article in this series gets into vendor onboarding flows, including the application form, document upload, and admin approval workflow. Subsequent articles cover commission structures, payout processing, and marketplace-specific product types.
If you’re starting a new multi-vendor build and want the full architecture reviewed before you write a line of code, get in touch through our WooCommerce development services. A short scoping call can save a lot of rework later.