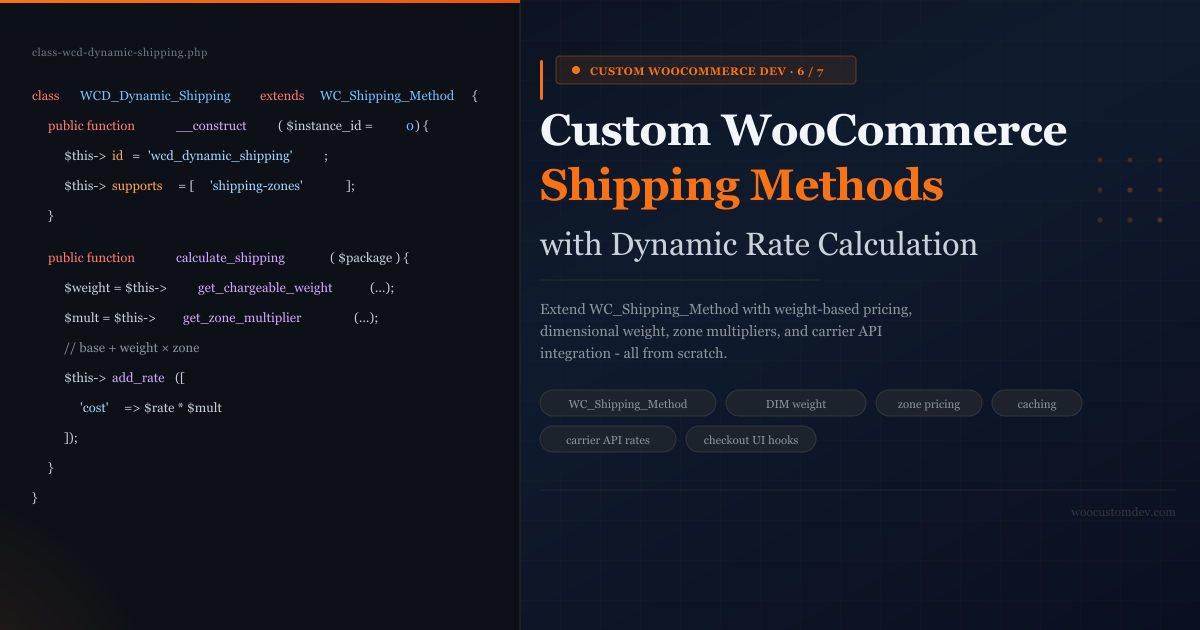
Custom WooCommerce Shipping Methods: A Complete Developer Guide

WooCommerce ships with three built-in shipping options: flat rate, free shipping, and local pickup. For most small stores, that is enough. But once your catalog grows beyond a handful of products – or once you start selling to customers in multiple regions with different shipping economics – those three options stop working. You end up either overcharging light-package buyers or absorbing losses on heavy ones. Custom WooCommerce shipping methods fix this by letting you write the rate calculation logic yourself, using exactly the rules your business requires.
This guide walks through building a complete custom shipping method from scratch. You will extend the WC_Shipping_Method class, implement dynamic rate calculation based on weight and dimensional weight, add zone-based pricing multipliers, integrate live rates from a carrier API, cache results for checkout performance, and customize the shipping calculator UI your customers see at checkout. All code is production-quality and commented for clarity.
Understanding the WC_Shipping_Method Framework
Every shipping option in WooCommerce – whether a core method or a third-party plugin – is a subclass of WC_Shipping_Method. This abstract class defines the interface that WooCommerce calls during checkout to get rates. There are two methods you must understand before writing a single line of your own code.
The first is __construct(). This is where you set the method’s identity: its ID string, its display title, a description, and which features it supports (shipping zones, instance settings, etc.). The constructor also calls $this->init() by convention, which loads the form fields and saved settings.
The second – and most important – is calculate_shipping( $package ). WooCommerce calls this method once per shipping zone that has your method enabled, passing it a package array that contains the cart contents, totals, and the customer’s destination address. Your job inside this method is to call $this->add_rate() one or more times with the rates you want to offer. If you call add_rate() three times, the customer sees three options. If you call it zero times, your method disappears from the checkout.
The entire WooCommerce shipping API reduces to one instruction: in
calculate_shipping(), call$this->add_rate()for every option you want customers to see. Everything else is setup work.
The $package array that WooCommerce passes you contains everything you need for dynamic pricing: $package['contents'] holds each cart item with its product data and quantity, $package['destination'] holds the shipping address including country, state, and postcode, and $package['contents_cost'] gives you the cart subtotal for that package (useful for free-shipping thresholds).
Shipping Zones and Instance IDs
WooCommerce’s shipping zone system is central to how custom methods work in production. When you register a shipping method, store admins can add it to one or more zones via WooCommerce – Settings – Shipping. Each time a method is added to a zone, a new instance is created with its own settings. This is why the constructor receives an $instance_id parameter: a store might have your method in three zones with three different rate configurations.
To support instance-specific settings, your method must declare 'shipping-zones' and 'instance-settings' in its $this->supports array. If you omit these, WooCommerce treats the method as a legacy global method with a single shared configuration – which is almost never what you want in a real store.
Step 1 – Register Your Custom Shipping Method
Before WooCommerce knows your method exists, you must register it via the woocommerce_shipping_methods filter. This filter passes you an array of all registered methods, keyed by method ID. Add your class name to this array and return it.
The method class itself should not be loaded until after WooCommerce has initialized – specifically after the woocommerce_shipping_init action fires. This ensures WC_Shipping_Method is available when your class is loaded.
Place this registration code in your plugin’s main file. If you are building this inside a theme for a single-site project, it can go in functions.php – but a plugin is strongly preferred because shipping logic should survive theme changes.
Step 2 – Build the Shipping Method Class with Dynamic Rate Calculation
The core of the implementation is the shipping method class. The snippet below implements the full class with four instance settings (base rate, per-kg rate, dimensional weight divisor, and free shipping threshold) and a calculate_shipping() method that applies all of them dynamically.
How the Rate Calculation Works
The calculate_shipping() method follows a clear sequence. First it checks whether the cart subtotal exceeds the free shipping threshold – if so, it adds a free rate and returns immediately. Then it calls get_chargeable_weight() to determine the weight to charge for, which accounts for dimensional weight. Finally it multiplies the base + weight cost by a zone-specific multiplier from get_zone_multiplier().
| Instance Setting | Default | Purpose |
|---|---|---|
| Base Rate | $5.00 | Flat fee on every shipment before weight surcharges |
| Rate Per kg | $1.50 | Added per kilogram of chargeable weight |
| DIM Divisor | 5000 | Dimensional weight formula: L x W x H / divisor (cm units) |
| Free Threshold | $100 | Orders above this qualify for free shipping; 0 = disabled |
Dimensional Weight Calculation
Dimensional weight (DIM weight) is the shipping industry’s way of charging for the space a package occupies, not just its actual mass. All major carriers – UPS, FedEx, DHL, and USPS for packages over one cubic foot – apply DIM weight pricing. The formula is: length x width x height divided by a carrier-specific divisor. The carrier charges whichever is greater: actual weight or dimensional weight.
The standard divisor is 5000 when dimensions are in centimeters (or 139 when using inches, as UPS and FedEx typically express for domestic US). For a 40cm x 30cm x 20cm box, the dimensional weight is 40 x 30 x 20 / 5000 = 4.8 kg. If the actual contents weigh 2 kg, the chargeable weight is 4.8 kg – more than double the real weight. Without DIM weight in your calculation, you will consistently underprice shipping on large lightweight items like pillows, packaging materials, or consumer electronics.
The get_chargeable_weight() method in the class handles this by summing actual weights and volumes across all items in the package, computing the dimensional weight, and returning whichever is larger with a minimum of 0.1 kg to prevent zero-weight edge cases.
Zone-Based Pricing Logic
The get_zone_multiplier() method returns a cost multiplier based on the destination. The example implementation uses a simple array of country and state codes – remote US states (Alaska, Hawaii, territories) get a 1.75x multiplier, contiguous US gets 1.0x, and international destinations get country-specific or a default 2.0x multiplier.
In production you will likely want to drive these multipliers from a database table or an admin settings panel rather than hardcoding them. A good approach is to store zone multipliers as a serialized array in a WordPress option, then add a settings tab in your plugin’s admin area where the store owner can adjust them without touching code. The WC_Settings_API class provides the structure for this.
Step 3 – Add Transient Caching for Performance
WooCommerce calls calculate_shipping() on every cart update: when a customer changes quantity, enters a coupon code, or updates their address. Without caching, each cart update triggers a fresh rate calculation – and if your calculation involves an external API call, that means multiple network requests per checkout session, adding 200-800ms of latency each time.
WordPress transients are the right tool here. The caching strategy is straightforward: build a deterministic cache key from the inputs that affect the rate result (destination postcode, country, state, and chargeable weight rounded to the nearest 0.5 kg), check for a cached result before calculating, and store the result after a fresh calculation. A 1-2 hour expiry works well for most stores – carrier rates do not change by the minute.
The trait pattern shown above lets you use the caching logic in any shipping method class with a single use WCD_Shipping_Cache; declaration, rather than copy-pasting the cache logic into each method class you build.
One note on rounding: the cache key rounds weight to the nearest 0.5 kg. This is intentional – it improves cache hit rates by treating a 3.1 kg package and a 3.4 kg package as cache-equivalent (both round to 3.0 or 3.5). The small rate difference between these weights is usually within acceptable rounding tolerance and the cache hit rate improvement is significant for stores selling items in a narrow weight range.
Step 4 – Integrating Live Carrier API Rates
Dynamic weight-based pricing covers many use cases, but some stores need real-time rates from carriers – the exact amount a shipment will cost from UPS, FedEx, or USPS at the moment of checkout. This requires making an outbound API call inside calculate_shipping().
The snippet below shows how to integrate EasyPost – a carrier API aggregator that returns rates from all your connected carriers in a single request – into the rate calculation flow. It incorporates the caching layer from Step 3 and includes proper error handling so a carrier API timeout does not break the entire checkout.
Error Handling is Not Optional
Notice that the API call is wrapped in a try-catch block. If the carrier API is unavailable, times out, or returns a malformed response, the catch block logs the error using WooCommerce’s built-in logger and falls back to a flat rate. The customer sees a shipping option (the fallback rate) rather than an empty shipping section that blocks them from completing checkout.
Log the errors at the error level using wc_get_logger(). WooCommerce writes these to a log file accessible at WooCommerce – Status – Logs, filterable by source. This makes debugging production API issues much easier than digging through PHP error logs.
Setting API Credentials Securely
The snippet retrieves the EasyPost API key via get_option('wcd_easypost_api_key'). Never hardcode API credentials in plugin code. Always store them in WordPress options, ideally entered through a settings page in the WooCommerce admin. If your plugin is distributed, consider using environment variables or a secrets manager – but for single-site custom development, storing in wp_options with a settings UI is the standard approach.
Add a woocommerce_update_options_shipping_ hook in your constructor to ensure the API key field is saved when the admin updates shipping zone settings. The WooCommerce settings API handles sanitization and nonce verification automatically when you use its form fields.
Step 5 – Customizing the Shipping Calculator UI
The default WooCommerce shipping calculator shows rate labels and prices, but gives no additional context to help customers choose. For custom shipping methods, you can enrich this UI significantly without modifying core templates.
The shipping calculator UI snippet adds three enhancements: delivery time estimates appended to each rate label, a notice below the calculator explaining the handling fee and free shipping threshold, and minimal CSS to style these additions. All three use standard WooCommerce hooks – no template overrides required.
The woocommerce_cart_shipping_method_full_label Filter
This filter passes you the full rendered label HTML for each shipping rate along with the rate object. You can append HTML, add badges, or modify the label entirely. The example appends a delivery estimate based on the rate ID – since your rate IDs encode the carrier and service (e.g., ups_ground, fedex_2day), you can map those to human-readable estimates without needing to store them separately.
Scope your filter logic to your method’s rates using strpos( $method->get_id(), 'wcd_dynamic_shipping' ). Without this check, your filter would run on every shipping method in the store including third-party ones, which can produce unexpected UI results.
The woocommerce_after_shipping_rate Action
This action fires after each shipping rate option is rendered in the shipping table. The second parameter is the zero-based index of the rate. The example uses it to insert a notice after the first rate only – displaying it once below all the options rather than once per rate. This hook is useful for adding context that applies to all rates rather than a specific one.
Adding Admin Settings for Store Operators
The instance settings defined in init_form_fields() appear in the shipping zone modal when a store admin clicks the method name. These settings are essential – they let the store owner tune base rates, per-kg costs, and thresholds without needing a developer. WooCommerce’s settings API handles rendering, saving, sanitization, and nonce verification automatically.
For more complex configuration (zone multipliers, carrier API keys, excluded product categories), add a dedicated settings tab. Extend WC_Integration or create a custom WooCommerce settings page using woocommerce_settings_tabs_array and woocommerce_settings_{tab_id} hooks. This keeps all shipping-related settings in one predictable place rather than scattered across the WordPress Settings menu.
When building form fields for zone multipliers, a table-based UI with add/remove rows works well. Store the data as a JSON-encoded array in a single WordPress option and render it with a custom type: 'title' field that outputs your custom HTML. WooCommerce’s settings API supports this pattern through the generate_{type}_html method hook pattern.
Testing Your Custom Shipping Method
Testing a custom shipping method requires covering the edge cases that cause real-world failures. Here is a checklist of scenarios to verify before going live:
- Zero-weight products – add a product with no weight set. The method should handle this without division by zero or returning a negative rate. The minimum weight guard in
get_chargeable_weight()covers this, but verify the output. - Mixed physical and virtual products – WooCommerce skips shipping calculation for orders containing only virtual products, but mixed carts should ship normally. Verify the method receives only physical items in the package contents.
- Free shipping threshold boundary – test at exactly the threshold value ($100.00), one cent below ($99.99), and one cent above ($100.01). All three should behave correctly (free, charged, free).
- Remote destination multiplier – place a test order with destination set to Alaska (AK) and verify the 1.75x multiplier is applied in the rate.
- Zone assignment – add the method to a specific zone and verify it appears only for destinations within that zone, not globally.
- Multiple instances – add the method to two different zones with different base rates. Verify each instance uses its own settings.
- Cache behavior – place two test orders with identical destination and weight. The second should return faster (cache hit). Use the WooCommerce debug log to verify the cache is being used.
- API failure fallback – for API-based rate methods, simulate a failure by using an invalid API key and verify the fallback flat rate appears at checkout rather than an empty shipping section.
Use a local development environment for all testing. WooCommerce’s custom payment gateway development guide lets you iterate on rate calculations without affecting live orders. Enable WP_DEBUG and WP_DEBUG_LOG to capture any PHP errors in your rate calculation logic.
Common Mistakes and How to Avoid Them
Not Declaring Shipping Zone Support
If you omit 'shipping-zones' and 'instance-settings' from $this->supports, your method will appear in the global shipping methods list rather than inside shipping zones. This is the legacy mode for methods built before WooCommerce had zones (pre-2.6). Almost all modern stores use zone-based shipping, so a method that bypasses zones creates a confusing admin experience and can produce incorrect rates for international orders.
Performing Heavy Computation on Every Cart Update
WooCommerce calls calculate_shipping() aggressively – on page load, on every form input change in the checkout, and on every AJAX cart update. Without caching, a rate calculation that involves database queries or API calls will run dozens of times per checkout session. Always implement the transient caching pattern from Step 3 before adding any external calls.
Missing the update_option Hook
Your shipping method’s admin settings will not save unless you hook $this->process_admin_options to woocommerce_update_options_shipping_{$this->id} in the constructor. This is easy to forget if you are following older tutorials that predate WooCommerce’s instance settings system. Without it, every time the admin clicks Save, the settings appear to update (no error message) but revert to defaults on the next page load.
Returning Rates Outside calculate_shipping()
All rate registration must happen via $this->add_rate() calls inside calculate_shipping(). Do not try to set rates via filters or actions outside this method. WooCommerce collects rates from all active methods by calling their calculate_shipping() methods in sequence, then aggregates the results. Anything outside this flow is ignored.
Frequently Asked Questions
Can I add multiple rate tiers from a single shipping method instance?
Yes. You can call $this->add_rate() multiple times in one calculate_shipping() call. Each call creates a separate option in the checkout. This is exactly how you would implement economy vs. express tiers, or present rates from multiple carriers side by side. Use distinct IDs for each rate (e.g., append a service code to $this->get_rate_id()) so WooCommerce can distinguish them.
How do I handle products that should not contribute to shipping weight?
Check the product’s virtual flag: $product->is_virtual(). Virtual products are already excluded from WooCommerce package contents by default – WooCommerce will not include them in the package passed to calculate_shipping(). For physical products you want to exclude for other reasons (like free-shipping promotional items), use the woocommerce_shipping_package_name or woocommerce_cart_shipping_packages filter to manipulate the package before it reaches your method.
Can I prevent the shipping method from showing when no rates are available?
Yes – simply do not call add_rate() in cases where the method should not appear. If calculate_shipping() returns without calling add_rate() at all, WooCommerce treats the method as having no available rates for that package and hides it from the checkout. This is the correct way to handle situations like “API returned no rates” or “destination country not supported” without showing an error.
How do I show different rates for different product categories?
Inside calculate_shipping(), you have full access to each product via $item['data'] – which is a WC_Product object. You can call wp_get_post_terms( $product->get_id(), 'product_cat' ) to get categories, then adjust your rate calculation based on what categories are present in the package. For example, add a hazmat surcharge if any product is in a “dangerous goods” category, or skip DIM weight for products tagged “soft goods” that compress in shipping.
What is the difference between a shipping method and a shipping rate?
A shipping method is the class you register – the piece of code. A shipping rate is what that class generates during checkout. One method can produce many rates. Think of “WCD Dynamic Shipping” as the method and “WCD Dynamic Shipping – Standard” plus “WCD Dynamic Shipping – Express” as two rates that method produces. WooCommerce stores methods in the settings but presents rates to the customer at checkout.
What to Build Next
The implementation in this guide gives you a fully functional dynamic shipping method with weight-based pricing, dimensional weight, zone multipliers, API rate integration, caching, and a customized checkout UI. From here, the most common enhancements are:
- Per-product rate overrides – let store managers set a custom shipping rate on individual products that bypasses the standard calculation. Store the override as product meta and check for it in
calculate_shipping()before running the standard formula. - Box packing algorithm – the current implementation treats all items as if they ship in one box. A bin-packing algorithm distributes items across multiple boxes with defined dimensions, producing more accurate rates for mixed-item orders. Several open-source PHP bin-packing libraries are available.
- Delivery date display on the cart page – beyond the checkout calculator, show estimated delivery dates on individual product pages and the cart. This requires combining your zone/speed logic with a cut-off time (orders before 2pm ship same day) and a calendar of carrier transit times.
- Admin rate simulation tool – a simple admin page where you enter a destination and package weight and see what rate your method would calculate, without placing a real order. This is invaluable for debugging zone multiplier configurations and carrier API responses in production.
This is Article 6 of 7 in the Custom WooCommerce Development series. The next and final article covers building custom WooCommerce REST API endpoints – extending the store’s REST API with your own routes for headless checkout, mobile apps, and third-party integrations. If you need help implementing WooCommerce Store API for your store, reach out to see how we work.