Running a WooCommerce marketplace is a logistics problem wrapped in a storefront. When your customers buy from three different vendors in a single cart, those products might ship from three different cities, three different warehouses, or three different countries. Standard WooCommerce shipping was built for single-origin stores. Drop it into a multi-vendor marketplace without customization and you end up with customers paying one shipping rate for goods that travel on four separate trucks.
This guide covers how to implement vendor-specific shipping rules properly: per-vendor shipping zones, separate shipment cost calculation, warehouse origin addresses per vendor, table rate configuration, and the PHP hooks that tie it all together. This is Article 5 in the WooCommerce Multi-vendor and Marketplace Series.
The Core Problem With Marketplace Shipping
In a standard WooCommerce store, there is one origin address. Shipping zones cover customer destinations, and the store owner controls every shipping method. In a marketplace with 20 active vendors, that model breaks down completely.
Consider what happens without vendor-specific shipping:
- A customer in Texas buys from a vendor in California and a vendor in New York. WooCommerce calculates one flat rate from the store’s registered address in Florida. The number is wrong for both vendors.
- A vendor offers free shipping on orders over $75. The store-level rule either applies to the entire cart or to nothing, so the threshold triggers on combined cart value rather than per-vendor subtotal.
- A vendor ships fragile ceramics via FedEx only. The checkout presents USPS Priority Mail as the cheapest option because that is the store’s default carrier contract.
Each problem has a solution, but the solutions require either a capable marketplace plugin (Dokan, WCFM, WC Vendors) or custom PHP hooks against WooCommerce’s shipping package system. Let’s work through both approaches.
How WooCommerce Shipping Packages Work
Before writing a single line of custom code, you need to understand how WooCommerce groups cart items into shipping packages. This is the foundation that makes per-vendor shipping possible.
By default, WooCommerce puts all cart items into a single package. That package is passed through the woocommerce_cart_shipping_packages filter, which is your primary entry point for splitting orders by vendor.
// Default: WooCommerce returns one package containing all cart items
add_filter( 'woocommerce_cart_shipping_packages', 'split_cart_by_vendor' );

function split_cart_by_vendor( $packages ) {
    $vendor_packages = array();

    foreach ( WC()->cart->get_cart() as $cart_item_key => $cart_item ) {
        $product_id = $cart_item['product_id'];
        $vendor_id  = get_post_field( 'post_author', $product_id );

        if ( ! isset( $vendor_packages[ $vendor_id ] ) ) {
            $vendor_packages[ $vendor_id ] = array(
                'contents'        => array(),
                'contents_cost'   => 0,
                'applied_coupons' => WC()->cart->get_applied_coupons(),
                'user'            => array(
                    'ID' => get_current_user_id(),
                ),
                'destination'     => array(
                    'country'   => WC()->customer->get_shipping_country(),
                    'state'     => WC()->customer->get_shipping_state(),
                    'postcode'  => WC()->customer->get_shipping_postcode(),
                    'city'      => WC()->customer->get_shipping_city(),
                    'address'   => WC()->customer->get_shipping_address(),
                    'address_2' => WC()->customer->get_shipping_address_2(),
                ),
                'vendor_id'       => $vendor_id,
            );
        }

        $vendor_packages[ $vendor_id ]['contents'][ $cart_item_key ] = $cart_item;
        $vendor_packages[ $vendor_id ]['contents_cost'] += $cart_item['line_total'];
    }

    return array_values( $vendor_packages );
}
This filter runs every time WooCommerce calculates shipping. The result is one package per vendor. Each package gets its own set of shipping methods, its own rate calculation, and its own display line in the checkout shipping section.
The woocommerce_shipping_methods Hook
The woocommerce_shipping_methods filter controls which shipping method classes are registered with WooCommerce. If you are building a custom vendor shipping method, register it here:
add_filter( 'woocommerce_shipping_methods', 'register_vendor_shipping_method' );

function register_vendor_shipping_method( $methods ) {
    $methods['vendor_flat_rate'] = 'WC_Vendor_Flat_Rate_Shipping';
    return $methods;
}
Per-Vendor Shipping Zones: Geographic Assignment
WooCommerce shipping zones map geographic regions (countries, states, postcodes) to shipping methods. In a marketplace, you want each vendor to operate within their own zone configuration, not the store-wide defaults.
Plugin-Based Zone Assignment
If you are using Dokan, WCFM Marketplace, or WC Vendors Pro, vendor shipping zone management is built in. Here is how each handles it:
| Plugin | Vendor Zone Control | Admin Override |
|---|---|---|
| Dokan Pro | Vendor sets own zones in dashboard | Admin can lock zone templates |
| WCFM Marketplace | Vendor configures shipping per product or store | Global rate caps available |
| WC Vendors Pro | Vendor shipping tab in dashboard | Admin sets allowed methods |
For a store built on Dokan Pro, the vendor shipping setup lives at WP Admin > Dokan > Modules > Vendor Shipping. Once enabled, each vendor gets a Shipping tab in their dashboard where they can create zones (e.g., “US Domestic,” “Canada,” “International”) and assign methods to each zone.
Custom Zone Assignment via PHP
If you are building a custom marketplace without a full vendor plugin, you can store vendor zone preferences as user meta and apply them at shipping calculation time:
/**
 * Get shipping zone ID assigned to a specific vendor.
 *
 * @param int $vendor_id
 * @return int|null
 */
function get_vendor_shipping_zone_id( $vendor_id ) {
    return get_user_meta( $vendor_id, '_vendor_shipping_zone_id', true ) ?: null;
}

/**
 * Apply vendor-specific rates to the woocommerce_package_rates.
 *
 * @param array $rates  Available shipping rates for this package.
 * @param array $package  The shipping package.
 * @return array
 */
add_filter( 'woocommerce_package_rates', 'apply_vendor_shipping_rates', 10, 2 );

function apply_vendor_shipping_rates( $rates, $package ) {
    if ( empty( $package['vendor_id'] ) ) {
        return $rates;
    }

    $vendor_id        = (int) $package['vendor_id'];
    $vendor_free_over = (float) get_user_meta( $vendor_id, '_vendor_free_shipping_threshold', true );
    $vendor_flat_rate = (float) get_user_meta( $vendor_id, '_vendor_flat_shipping_rate', true );
    $package_total    = $package['contents_cost'];

    $custom_rates = array();

    // Apply vendor flat rate if configured
    if ( $vendor_flat_rate > 0 ) {
        $rate_id = 'vendor_flat_rate_' . $vendor_id;
        $custom_rates[ $rate_id ] = new WC_Shipping_Rate(
            $rate_id,
            get_user_meta( $vendor_id, 'display_name', true ) . ' Shipping',
            $vendor_flat_rate,
            array(),
            'vendor_flat_rate'
        );
    }

    // Override with free shipping if threshold is met
    if ( $vendor_free_over > 0 && $package_total >= $vendor_free_over ) {
        $rate_id = 'vendor_free_' . $vendor_id;
        $custom_rates[ $rate_id ] = new WC_Shipping_Rate(
            $rate_id,
            get_user_meta( $vendor_id, 'display_name', true ) . ' Free Shipping',
            0,
            array(),
            'vendor_free_shipping'
        );
        // Remove the flat rate when free shipping applies
        unset( $custom_rates[ 'vendor_flat_rate_' . $vendor_id ] );
    }

    return ! empty( $custom_rates ) ? $custom_rates : $rates;
}
Vendor Shipping Methods: Flat Rate, Free Shipping, and Table Rate
Flat Rate Per Vendor
Flat rate is the simplest vendor shipping method and works well for vendors with consistent product weights and domestic shipping only. Store the rate in user meta and apply it during package rate calculation as shown above.
A good flat rate structure for marketplace vendors typically uses:
- A base rate per shipment (e.g., $5.99)
- An optional per-item additional cost (e.g., $1.50 per item after the first)
- Different rates by destination zone (domestic vs. international)
Free Shipping Thresholds Per Vendor
Free shipping thresholds in a marketplace must calculate against the per-vendor cart subtotal, not the total cart value. This is the most common misconfiguration in marketplace shipping setups.
If the cart has $60 from Vendor A and $40 from Vendor B, and both vendors offer free shipping over $75, neither threshold should trigger. Without package splitting, WooCommerce sees a $100 cart and might apply free shipping to the entire order.
The package splitting code shown earlier solves this. Each package carries only that vendor’s items and the contents_cost reflects only that vendor’s subtotal. The threshold check in apply_vendor_shipping_rates compares against $package['contents_cost'], which is exactly what you want.
Table Rate Shipping Per Vendor
Table rate shipping calculates costs based on conditions: weight ranges, item counts, cart value, or destination. WooCommerce Table Rate Shipping (the official WooCommerce extension) supports per-zone table rate rules, which gives you per-vendor control when combined with vendor zones.
The configuration path in Dokan with Table Rate Shipping enabled:
- Vendor logs into their dashboard and opens Shipping
- Creates or selects a shipping zone (e.g., “United States”)
- Adds “Table Rate” as the method for that zone
- Configures rows: weight 0-5 lbs = $6.99, weight 5-15 lbs = $12.99, weight 15+ lbs = $19.99
- Saves. The rates apply only to that vendor’s packages at checkout.
For a custom implementation without a marketplace plugin, you can build a lightweight table rate resolver:
/**
 * Calculate table rate shipping cost for a vendor package.
 *
 * @param int   $vendor_id
 * @param array $package
 * @return float
 */
function get_vendor_table_rate_cost( $vendor_id, $package ) {
    // Table rates stored as serialized array in user meta
    // Format: [['weight_min'=>0,'weight_max'=>5,'cost'=>6.99]...]
    $table_rates   = get_user_meta( $vendor_id, '_vendor_table_rates', true );
    $package_weight = 0;

    foreach ( $package['contents'] as $item ) {
        $product         = $item['data'];
        $weight          = $product->get_weight() ? (float) $product->get_weight() : 0;
        $package_weight += $weight * $item['quantity'];
    }

    if ( empty( $table_rates ) || ! is_array( $table_rates ) ) {
        return 0;
    }

    foreach ( $table_rates as $rate_row ) {
        if ( $package_weight >= $rate_row['weight_min'] && $package_weight < $rate_row['weight_max'] ) {
            return (float) $rate_row['cost'];
        }
    }

    // Return last tier for anything above max
    $last_row = end( $table_rates );
    return (float) $last_row['cost'];
}
Vendor Warehouse Locations: Setting Origin Address Per Vendor
Carriers like UPS, FedEx, and USPS calculate shipping costs based on origin and destination ZIP codes. For accurate calculated shipping in a marketplace, each vendor must have their warehouse or fulfillment origin stored and passed to the carrier API.
Storing Vendor Origin Address
Store vendor warehouse data as user meta during vendor onboarding:
// Meta keys for vendor warehouse location
// _vendor_warehouse_address_1
// _vendor_warehouse_city
// _vendor_warehouse_state
// _vendor_warehouse_postcode
// _vendor_warehouse_country

/**
 * Get vendor origin address for shipping calculation.
 *
 * @param int $vendor_id
 * @return array
 */
function get_vendor_origin_address( $vendor_id ) {
    return array(
        'address_1' => get_user_meta( $vendor_id, '_vendor_warehouse_address_1', true ),
        'city'      => get_user_meta( $vendor_id, '_vendor_warehouse_city', true ),
        'state'     => get_user_meta( $vendor_id, '_vendor_warehouse_state', true ),
        'postcode'  => get_user_meta( $vendor_id, '_vendor_warehouse_postcode', true ),
        'country'   => get_user_meta( $vendor_id, '_vendor_warehouse_country', true ) ?: 'US',
    );
}
Passing Vendor Origin to WooCommerce Shipping Packages
The shipping package array supports an origin key. Some carrier rate plugins (ShipStation, EasyPost, WooCommerce Shipping) read this to determine the shipment's starting point. Add it when building your vendor packages:
add_filter( 'woocommerce_cart_shipping_packages', 'split_cart_by_vendor_with_origin' );

function split_cart_by_vendor_with_origin( $packages ) {
    $vendor_packages = array();

    foreach ( WC()->cart->get_cart() as $cart_item_key => $cart_item ) {
        $product_id = $cart_item['product_id'];
        $vendor_id  = (int) get_post_field( 'post_author', $product_id );
        $origin     = get_vendor_origin_address( $vendor_id );

        if ( ! isset( $vendor_packages[ $vendor_id ] ) ) {
            $vendor_packages[ $vendor_id ] = array(
                'contents'        => array(),
                'contents_cost'   => 0,
                'applied_coupons' => WC()->cart->get_applied_coupons(),
                'user'            => array( 'ID' => get_current_user_id() ),
                'destination'     => array(
                    'country'   => WC()->customer->get_shipping_country(),
                    'state'     => WC()->customer->get_shipping_state(),
                    'postcode'  => WC()->customer->get_shipping_postcode(),
                    'city'      => WC()->customer->get_shipping_city(),
                    'address'   => WC()->customer->get_shipping_address(),
                    'address_2' => WC()->customer->get_shipping_address_2(),
                ),
                'origin'          => $origin,
                'vendor_id'       => $vendor_id,
                'vendor_name'     => get_user_meta( $vendor_id, 'store_name', true ),
            );
        }

        $vendor_packages[ $vendor_id ]['contents'][ $cart_item_key ] = $cart_item;
        $vendor_packages[ $vendor_id ]['contents_cost'] += $cart_item['line_total'];
    }

    return array_values( $vendor_packages );
}
Shipping Cost Calculation for Multi-Vendor Orders
With package splitting in place, WooCommerce calculates rates for each package independently. At checkout, customers see a shipping section for each vendor package. The total shipping charge is the sum of all vendor package shipping selections.
Checkout Display for Multiple Vendor Packages
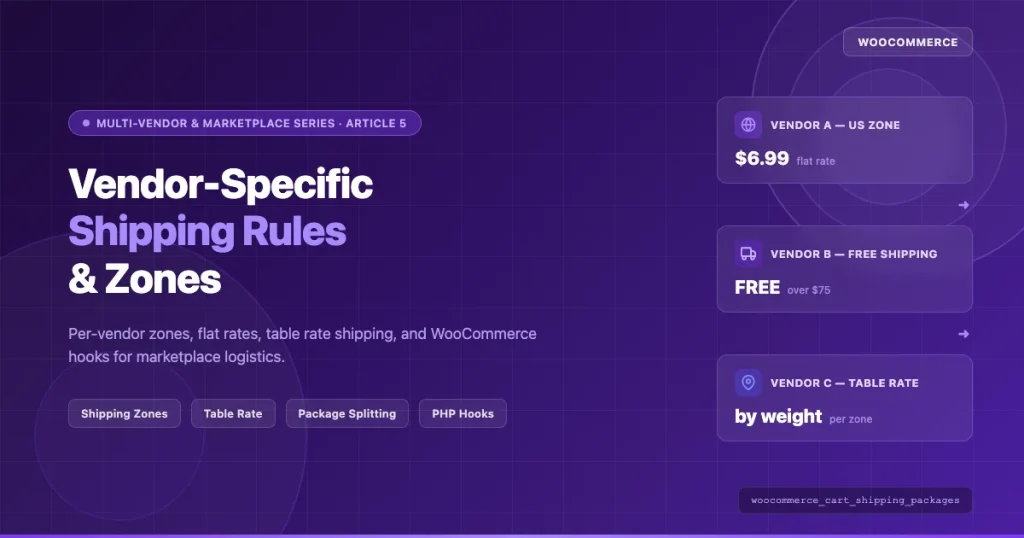
When an order contains products from two vendors, the checkout shipping section shows:
Shipping

Shipment 1 - Vendor A (Portland, OR)
  [x] Standard Shipping   $6.99
  [ ] Express Shipping    $14.99

Shipment 2 - Vendor B (Chicago, IL)
  [x] Standard Shipping   $5.99
  [ ] Free Shipping (orders over $75)  FREE
To label each shipping package with the vendor name instead of the default "Shipment 1," "Shipment 2" labels, add a name key to each package in your splitting function:
$vendor_packages[ $vendor_id ]['name'] = sprintf(
    /* translators: %s: vendor store name */
    __( 'Shipment from %s', 'your-textdomain' ),
    get_user_meta( $vendor_id, 'store_name', true ) ?: __( 'Vendor', 'your-textdomain' )
);
Combined Order, Separate Fulfillment
From the WooCommerce order perspective, there is still one order record. The package split affects shipping calculation and display at checkout. After the order is placed, vendor plugins like Dokan handle splitting the order into vendor-specific sub-orders that each vendor can fulfill independently.
This matters because shipping label generation happens at the sub-order level. Each vendor generates their own shipping label (or the marketplace admin generates it) against their sub-order items, not the parent order.
Combined Shipping vs. Separate Vendor Shipment Costs
The question of whether to show customers one combined shipping charge or separate per-vendor charges is a UX and business model decision. Both approaches are valid, and WooCommerce supports both.
When Separate Vendor Shipping Costs Make Sense
- Vendors ship from very different locations (domestic vs. international)
- Vendors have fundamentally different carrier relationships
- Marketplace transparency is a selling point (customers trust itemized charges)
- Vendor commission structure is shipping-inclusive (vendor absorbs cost above their rate)
When a Combined Flat Rate Makes Sense
- All vendors are in the same country and use the same carrier
- Marketplace offers a shipping subscription or flat-rate membership
- Customer research shows multi-step shipping selection causes cart abandonment
- Marketplace absorbs shipping variance into commission structure
Implementing a Combined Flat Rate
To present a single shipping charge despite splitting packages internally, collapse the packages back to one in the filter but preserve vendor-level origin data for your own fulfillment logic:
add_filter( 'woocommerce_cart_shipping_packages', 'apply_combined_marketplace_shipping' );

function apply_combined_marketplace_shipping( $packages ) {
    // Check if combined shipping mode is enabled
    $use_combined = get_option( 'marketplace_combined_shipping', false );
    if ( ! $use_combined ) {
        // Let the per-vendor split function handle it
        return split_cart_by_vendor_with_origin( $packages );
    }

    // Single package for display, store vendor data in package meta
    $combined_package = array(
        'contents'        => WC()->cart->get_cart(),
        'contents_cost'   => WC()->cart->get_subtotal(),
        'applied_coupons' => WC()->cart->get_applied_coupons(),
        'user'            => array( 'ID' => get_current_user_id() ),
        'destination'     => array(
            'country'   => WC()->customer->get_shipping_country(),
            'state'     => WC()->customer->get_shipping_state(),
            'postcode'  => WC()->customer->get_shipping_postcode(),
            'city'      => WC()->customer->get_shipping_city(),
            'address'   => WC()->customer->get_shipping_address(),
            'address_2' => WC()->customer->get_shipping_address_2(),
        ),
    );

    return array( $combined_package );
}
WooCommerce Table Rate Shipping Per-Vendor Configuration
WooCommerce Table Rate Shipping (the official $119/year extension) stores rates in the woocommerce_shipping_table_rates database table. Each set of rates belongs to a shipping zone. When you combine this extension with vendor-specific zones, each vendor gets their own zone, and each zone gets its own table rate configuration.
Setting Up Vendor-Specific Table Rate Zones
The recommended setup for a marketplace using WooCommerce Table Rate Shipping:
- Create a zone template per region: "US Zone - Domestic," "Canada Zone," "EU Zone"
- Clone zones per vendor: Each vendor gets their own copies of relevant zones
- Store zone IDs per vendor:
update_user_meta( $vendor_id, '_shipping_zone_ids', [us_zone_id, canada_zone_id] ) - Route packages to vendor zones: In the package filter, tag each package with the appropriate zone ID based on destination and vendor
Programmatically creating a shipping zone and assigning a table rate method:
/**
 * Create a WooCommerce shipping zone for a vendor.
 *
 * @param int    $vendor_id
 * @param string $region_name
 * @param array  $locations  e.g. [['type'=>'country','code'=>'US']]
 * @return int Zone ID
 */
function create_vendor_shipping_zone( $vendor_id, $region_name, $locations ) {
    $zone = new WC_Shipping_Zone();
    $zone->set_zone_name( $region_name );
    $zone->save();

    foreach ( $locations as $location ) {
        $zone->add_location( $location['code'], $location['type'] );
    }

    $zone->save();
    $zone_id = $zone->get_id();

    // Add table rate shipping method to this zone
    $zone->add_shipping_method( 'table_rate' );

    // Store zone ID in vendor meta
    $existing_zones   = get_user_meta( $vendor_id, '_shipping_zone_ids', true ) ?: array();
    $existing_zones[] = $zone_id;
    update_user_meta( $vendor_id, '_shipping_zone_ids', $existing_zones );

    return $zone_id;
}
Filtering woocommerce_package_rates for Vendor-Specific Logic
The woocommerce_package_rates filter is the most powerful tool for customizing what rates appear at checkout for a given package. It runs after WooCommerce has calculated all available rates for a package and before they are displayed to the customer.
Here is a comprehensive implementation that handles multiple vendor shipping scenarios:
/**
 * Apply vendor-specific shipping logic to package rates.
 *
 * Handles:
 * - Removing methods the vendor has not enabled
 * - Applying vendor-specific markup or discount
 * - Enforcing free shipping thresholds per vendor
 * - Adding vendor name to rate labels
 *
 * @param array $rates
 * @param array $package
 * @return array
 */
add_filter( 'woocommerce_package_rates', 'vendor_package_rate_filter', 20, 2 );

function vendor_package_rate_filter( $rates, $package ) {
    if ( empty( $package['vendor_id'] ) ) {
        return $rates;
    }

    $vendor_id        = (int) $package['vendor_id'];
    $vendor_name      = get_user_meta( $vendor_id, 'store_name', true ) ?: 'Vendor';
    $enabled_methods  = get_user_meta( $vendor_id, '_vendor_enabled_shipping_methods', true );
    $shipping_markup  = (float) get_user_meta( $vendor_id, '_vendor_shipping_markup_percent', true );
    $free_threshold   = (float) get_user_meta( $vendor_id, '_vendor_free_shipping_threshold', true );
    $package_subtotal = (float) $package['contents_cost'];

    $filtered_rates = array();

    foreach ( $rates as $rate_id => $rate ) {
        // Skip methods vendor has not enabled (if restriction list exists)
        if ( ! empty( $enabled_methods ) && is_array( $enabled_methods ) ) {
            $method_type = $rate->get_method_id();
            if ( ! in_array( $method_type, $enabled_methods, true ) ) {
                continue;
            }
        }

        // Apply vendor shipping markup/discount
        if ( $shipping_markup !== 0.0 && $rate->get_cost() > 0 ) {
            $original_cost = $rate->get_cost();
            $adjusted_cost = $original_cost * ( 1 + ( $shipping_markup / 100 ) );
            $rate->set_cost( max( 0, $adjusted_cost ) );
        }

        // Prefix vendor name to rate label for clarity at checkout
        $original_label = $rate->get_label();
        $rate->set_label( sprintf( '%s: %s', $vendor_name, $original_label ) );

        $filtered_rates[ $rate_id ] = $rate;
    }

    // Override all rates with free shipping if vendor threshold is met
    if ( $free_threshold > 0 && $package_subtotal >= $free_threshold ) {
        $free_rate_id = 'vendor_free_' . $vendor_id;
        $free_rate    = new WC_Shipping_Rate(
            $free_rate_id,
            sprintf( '%s: Free Shipping', $vendor_name ),
            0,
            array(),
            'vendor_free_shipping'
        );
        return array( $free_rate_id => $free_rate );
    }

    return ! empty( $filtered_rates ) ? $filtered_rates : $rates;
}
Caching Package Rates
WooCommerce caches shipping rates using a transient based on the package hash. With per-vendor packages, each unique combination of vendor ID, customer destination, and cart contents generates its own cached rate set. This is correct behavior, but on stores with many vendors and high traffic you may want to adjust the cache duration:
// Extend shipping rate cache to 1 hour (default is session-based)
add_filter( 'woocommerce_shipping_method_cache_duration', function() {
    return HOUR_IN_SECONDS;
} );
Vendor-Specific Shipping in Dokan: Step-by-Step Configuration
Dokan is the most widely deployed WooCommerce marketplace plugin and has the most complete vendor shipping implementation. Here is the admin configuration path for enabling per-vendor shipping:
Admin Setup
- Go to WP Admin > Dokan > Settings > Shipping
- Set Shipping Management to "Vendor"
- Enable Vendor Shipping under Dokan Modules if running Dokan Pro
- Configure admin-level fallback shipping for vendors who have not set up their own rates
Vendor Dashboard Setup
- Vendor logs in and goes to Vendor Dashboard > Settings > Shipping
- Clicks Add Shipping Zone
- Names the zone (e.g., "Continental US") and selects regions (states or country)
- Adds a shipping method to the zone: Flat Rate, Free Shipping, or Local Pickup
- Configures the method settings: cost formula, free shipping minimum order amount, etc.
- Saves. The zone activates immediately for all products from that vendor.
Dokan Shipping Cost Formula Syntax
Dokan's flat rate method supports WooCommerce's cost formula syntax, which allows dynamic rates based on item count and quantity:
5.99 + (1.50 * [qty])    // $5.99 base + $1.50 per item
[qty] * 2.00             // $2.00 per item, no base
10.00                    // flat $10.00 regardless of quantity
Order Fulfillment and Shipping Label Generation
After a customer places an order, the shipping package data does not persist in the order in a way that WooCommerce natively exposes for fulfillment. Marketplace plugins handle this by creating sub-orders. For a custom marketplace, you need to store vendor shipping selections as order meta.
/**
 * Store chosen shipping method per vendor package in order meta.
 * Hook: woocommerce_checkout_order_created
 *
 * @param WC_Order $order
 */
add_action( 'woocommerce_checkout_order_created', 'save_vendor_shipping_to_order' );

function save_vendor_shipping_to_order( $order ) {
    $packages = WC()->shipping()->get_packages();
    $vendor_shipping_data = array();

    foreach ( $packages as $package_index => $package ) {
        if ( empty( $package['vendor_id'] ) ) {
            continue;
        }

        $chosen_methods = WC()->session->get( 'chosen_shipping_methods' );
        $chosen_method  = $chosen_methods[ $package_index ] ?? '';

        $vendor_shipping_data[] = array(
            'vendor_id'     => $package['vendor_id'],
            'vendor_name'   => $package['vendor_name'] ?? '',
            'origin'        => $package['origin'] ?? array(),
            'chosen_method' => $chosen_method,
            'package_items' => array_keys( $package['contents'] ),
        );
    }

    if ( ! empty( $vendor_shipping_data ) ) {
        $order->update_meta_data( '_vendor_shipping_packages', $vendor_shipping_data );
        $order->save();
    }
}
Testing Your Vendor Shipping Configuration
Before going live, test these specific scenarios:
Test Cases
- Single vendor, domestic: Cart with products from one vendor. Verify correct rates show, vendor name appears in label, origin address is correct vendor's warehouse.
- Two vendors, same destination: Cart with products from two vendors shipping to the same US address. Verify two separate shipping sections appear with correct per-vendor rates.
- Free shipping threshold, per vendor: Add $80 of items from Vendor A (threshold $75) and $40 from Vendor B (threshold $75). Verify Vendor A shows free shipping, Vendor B does not.
- Vendor with no shipping configured: Product from a vendor who has not set up shipping. Verify fallback rates apply or a clear message appears rather than a silent $0 or PHP error.
- International destination: Cart with domestic-only vendor items shipping to Canada. Verify appropriate "No shipping available" or restricted method set.
Debugging Shipping Package Issues
To inspect what packages WooCommerce is building during a test order, add a temporary debug output:
// Temporary debug - remove before production
add_filter( 'woocommerce_cart_shipping_packages', function( $packages ) {
    if ( current_user_can( 'manage_options' ) && isset( $_GET['debug_shipping'] ) ) {
        echo '';
        foreach ( $packages as $i => $package ) {
            echo "Package $i:\n";
            echo "  Vendor ID: " . ( $package['vendor_id'] ?? 'none' ) . "\n";
            echo "  Items: " . count( $package['contents'] ) . "\n";
            echo "  Cost: " . $package['contents_cost'] . "\n";
            echo "  Origin: " . json_encode( $package['origin'] ?? [] ) . "\n";
        }
        echo '';
    }
    return $packages;
}, 999 );
Common Mistakes and How to Avoid Them
Mistake 1: Running Package Split on Every Page Load
The woocommerce_cart_shipping_packages filter fires on every cart and checkout page load. If your package-splitting function makes database queries per item, you can easily generate 50+ queries on a large cart. Cache vendor lookups in a local array within the function:
$vendor_cache = array(); // local cache within function scope
foreach ( WC()->cart->get_cart() as $key => $item ) {
    $product_id = $item['product_id'];
    if ( ! isset( $vendor_cache[ $product_id ] ) ) {
        $vendor_cache[ $product_id ] = (int) get_post_field( 'post_author', $product_id );
    }
    $vendor_id = $vendor_cache[ $product_id ];
    // ...
}
Mistake 2: Incorrect Package Hash Causing Cache Misses
WooCommerce generates a shipping cache hash from the package contents. If you add non-serializable data (closures, object references) to the package array, the hash generation fails and rates are never cached. Keep package data to strings, integers, and arrays.
Mistake 3: Overriding Rates Too Early
If you hook woocommerce_package_rates at priority 10, some carrier plugins have not finished adding their rates yet. Use priority 20 or higher to ensure all rates are present before you filter them.
Mistake 4: Not Handling Empty Packages
If a vendor's products are all digital or all on backorder, they may generate an empty package. Always check $package['contents'] is not empty before processing:
if ( empty( $package['contents'] ) ) {
    continue; // Skip empty packages
}
Related WooCommerce Marketplace Resources
Vendor shipping is one piece of a complete marketplace setup. If you are building out the vendor onboarding workflow alongside shipping configuration, see how to automate vendor onboarding in WooCommerce marketplaces with verification workflows for a step-by-step guide covering registration forms, document verification, and approval queues.
Commission structures and shipping costs interact closely in marketplace economics. For a detailed look at percentage, flat-rate, tiered, and per-vendor commission configurations, the WooCommerce commission systems guide covers the full setup across Dokan, WCFM, and WC Vendors Pro.
Conclusion
Vendor-specific shipping in WooCommerce marketplaces requires work that the default WooCommerce setup does not do for you. The three essential pieces are: splitting the cart into per-vendor packages via woocommerce_cart_shipping_packages, storing per-vendor shipping configuration (flat rates, table rates, free thresholds, origin addresses) in user meta, and filtering rates per package via woocommerce_package_rates.
If you are using Dokan, WCFM, or WC Vendors Pro, much of this infrastructure is provided. The custom PHP code in this guide fills the gaps for stores built outside those platforms or with requirements those plugins do not cover.
For most marketplace projects, starting with a vendor plugin's built-in shipping is the right call. Use custom hooks for exceptions: unusual rate logic, carrier-specific integrations, or marketplace policies that the plugin's admin UI cannot express. Keep the package-splitting code lean, cache aggressively, and test with carts from multiple vendors before going live.