Setting commission rates in a multi-vendor store is not a one-size-fits-all task. An electronics reseller operating on thin margins needs a different deal than an independent artist selling handmade prints. This guide walks through how to configure WooCommerce commission systems using the three leading multi-vendor plugins, Dokan, WCFM Marketplace, and WC Vendors, so you can build a payout structure that works for every vendor on your platform.
Why Commission Flexibility Matters in Multi-Vendor Marketplaces
Most marketplace operators start with a single global commission rate, say, 10% admin fee on every sale. That works on day one, but it breaks down quickly once you have vendors selling products with very different margin profiles.
Consider two real-world scenarios:
- Electronics marketplace: Vendors sell laptops and accessories at 5–12% gross margin. An 8% flat admin fee is the ceiling before vendors leave for Amazon. You need a fixed rate, not a percentage tied to product price.
- Art and handcraft marketplace: Artists set their own prices with 60–80% margin. A tiered structure, 30% commission on the first $500/month, dropping to 20% above $500, then 10% above $2,000, rewards top sellers while maintaining baseline revenue from newcomers.
Getting commissions wrong costs you vendors. Getting them right is a retention and recruitment tool. When you also customize the WooCommerce checkout flow for higher conversion rates, vendor earnings increase, making your commission structure even more attractive to top sellers.
Dokan, WCFM, and WC Vendors: Commission Feature Comparison
Before diving into configuration, here is how the three plugins compare on commission flexibility:
| Feature | Dokan Pro | WCFM Marketplace | WC Vendors Pro |
|---|---|---|---|
| Global % commission | Yes | Yes | Yes |
| Global flat-rate commission | Yes | Yes | Yes |
| Per-vendor override | Yes | Yes | Yes |
| Per-product override | Yes | Yes | Yes |
| Per-category commission | Yes (Pro) | Yes | Limited |
| Tiered/volume commissions | Yes (Pro) | Yes (WCFM Ultimate) | No (requires add-on) |
| Withholding tax handling | Limited | Yes (Ultimate) | No native support |
| Automatic payouts | Yes (Stripe/PayPal) | Yes (multiple gateways) | Yes (Stripe Connect) |
| Commission reporting | Yes | Yes | Basic |
WCFM Marketplace has the deepest commission feature set out of the box. Dokan Pro is the most widely deployed and has the best balance of features and documentation. WC Vendors is the lightest option and suits simpler setups.
Setting Up Global Commission Rates
Dokan Pro
Navigate to WP Admin > Dokan > Settings > Selling Options. You will find two core fields:
- Admin Commission: Enter a percentage (e.g.,
8for 8%) or a fixed amount. - Commission Type: Choose Percentage, Flat, or Percentage + Flat (combination mode).
The combination mode is useful for platforms that charge a percentage fee plus a fixed processing fee per transaction, for example, 5% + $0.30 per order.
WCFM Marketplace
Go to WP Admin > WCFM > Settings > Commission. The panel shows:
- Commission Type: Percentage, Fixed, or Percentage + Fixed.
- Commission: The rate (e.g.,
10for 10% or5.00for a $5 flat fee). - Tax: Whether tax is included in the commission base.
- Shipping: Whether shipping charges are included in the commission calculation.
Excluding tax and shipping from the commission base is almost always the right choice, you want to take a cut of product revenue, not the customer’s shipping cost or the government’s portion.
WC Vendors Pro
Go to WP Admin > WC Vendors > Settings > Commissions. Set the global vendor commission (the amount paid to the vendor, not the admin fee). For example, entering 90 means vendors keep 90% and your platform keeps 10%.
Note on framing: Dokan and WCFM express the admin’s fee (what you keep). WC Vendors expresses the vendor’s share (what they keep). Both arrive at the same split, just make sure you are reading the label correctly before setting rates.
Per-Vendor Commission Overrides
Global rates are the floor. Per-vendor overrides let you reward high-volume sellers or accommodate vendors who negotiated better terms during onboarding.
Dokan Pro: Setting a Vendor-Level Commission
Go to WP Admin > Dokan > Vendors, find the vendor, and click Edit. Scroll to the Commission section. Check Override Default Commission, then enter the custom rate and type. This vendor’s orders will use this rate instead of the global setting.
WCFM Marketplace: Vendor Commission Settings
Navigate to WP Admin > WCFM > Vendors and click the vendor’s name. Under the Commission tab, you can set a custom rate that overrides the global default. WCFM also lets you set this from the vendor’s own dashboard if you grant them that permission, useful for marketplace models where vendors propose their own rates.
WC Vendors Pro: Per-Vendor Rate
In WP Admin > Users, find the vendor’s user account and open their profile. Scroll to the WC Vendors section. Enter a custom commission percentage for this vendor. Save the profile. WC Vendors checks for a user-level rate before falling back to the global default.
Per-Product Commission Overrides
Per-product overrides solve a common marketplace problem: a vendor sells both cheap accessories and expensive high-margin items. A flat 10% on both may overpay on the accessories and underprice the premium products. This is especially relevant if you offer custom WooCommerce product types beyond simple and variable, where pricing and margin structures differ significantly from standard products.
Dokan and WCFM: Product-Level Commission
In both plugins, edit any WooCommerce product and look for the Vendor Commission or Commission meta box on the product edit screen. Enter a custom rate here. The product-level rate takes priority over the vendor-level rate, which takes priority over the global rate.
Priority order: Product > Vendor > Category > Global.
WC Vendors Pro: Product Commissions
WC Vendors handles this through the vendor’s own dashboard. Vendors can set a commission on individual products if the admin enables the Per Product Commission option under WC Vendors > Settings > Products. Admins can also set it directly on the product edit screen in the back end.
Category-Based Commission Rates
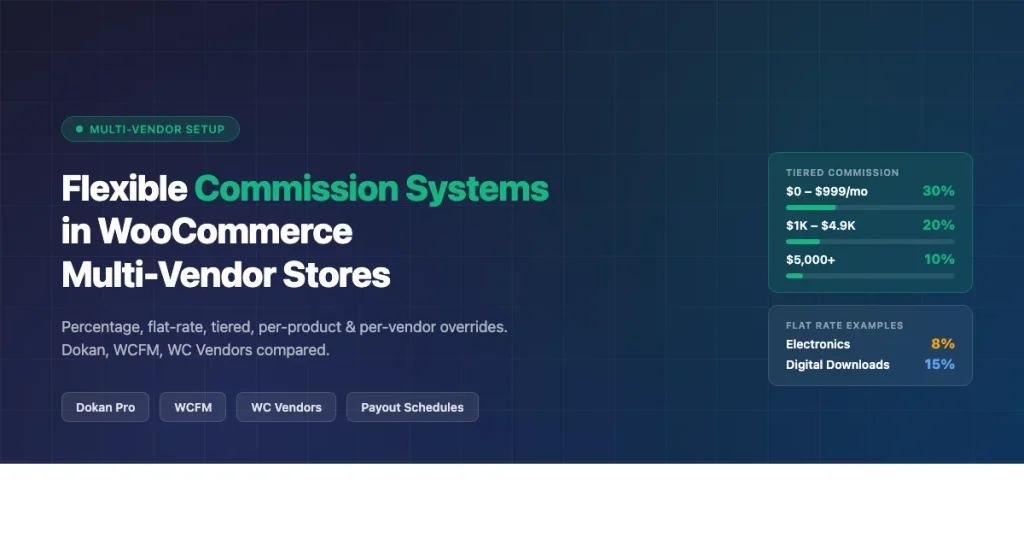
Category-based rates are ideal when your marketplace spans very different product types. An 8% rate on electronics and a 20% rate on digital downloads can live side by side without manually editing hundreds of products.
Dokan Pro: Category Commission
This feature requires Dokan Pro. Go to WP Admin > Dokan > Settings > Selling Options and look for the Commission by Category section. Add a row for each product category and set the rate and type. Any product in that category will use this rate unless overridden at the product or vendor level.
WCFM Marketplace: Category Commission
WCFM handles category commissions directly on the product category edit screen. Go to WP Admin > Products > Categories, click a category, and scroll down to the WCFM Commission section. Set the rate and type. This is particularly clean because it keeps commission settings inside the normal WooCommerce category workflow.
Tiered and Volume-Based Commissions
Tiered commissions incentivize vendors to grow their sales by reducing your platform’s take as they hit higher revenue thresholds. This is the structure used by many successful marketplaces to retain top performers.
Example, art marketplace tiered structure:
- Vendor monthly sales $0–$999: vendor keeps 70%, platform keeps 30%
- Vendor monthly sales $1,000–$4,999: vendor keeps 80%, platform keeps 20%
- Vendor monthly sales $5,000+: vendor keeps 90%, platform keeps 10%
Dokan Pro: Tiered Commissions
Dokan Pro includes a Tiered Commission feature. To configure it, go to WP Admin > Dokan > Settings > Selling Options > Commission Type and select Tiered. You will then define tiers by revenue range and assign a commission rate to each tier. Dokan calculates the vendor’s cumulative monthly earnings and applies the matching tier automatically.
WCFM Ultimate: Commission Tiers
WCFM’s tiered commissions are available in the WCFM Ultimate tier. Navigate to WP Admin > WCFM > Settings > Commission > Commission Tiers. Add tiers by minimum sales amount and set a commission rate for each. WCFM evaluates the vendor’s total earnings over the configured period (monthly by default) and applies the tier accordingly.
WC Vendors does not include native tiered commissions. You would need a custom add-on or a code-based solution using the wcv_commission_rate filter hook.
Payout Schedules and Automatic Disbursements
Calculating the right commission is only half the job. Vendors need to receive their earnings on a predictable schedule.
Dokan Pro: Payout Configuration
Go to WP Admin > Dokan > Settings > Withdraw. Key settings:
- Withdraw Threshold: Minimum days an order must be in Completed status before the commission becomes withdrawable. Set this to your return/refund window (e.g., 14 days).
- Minimum Withdraw Amount: Prevents micro-payouts. Set to $20–$50 for most markets.
- Withdraw Methods: Enable PayPal, Stripe, bank transfer, or custom methods.
- Automatic Disbursement: Available with Dokan Stripe Connect. Payouts hit vendor accounts on the schedule you define, weekly, biweekly, or monthly.
WCFM Marketplace: Payment Schedules
WCFM’s payout settings are at WP Admin > WCFM > Settings > Payment. You can set payment schedules to Instantly on Order Complete, Daily, Weekly, or Monthly. Instant payouts with Stripe Connect mean vendors see money in their accounts within minutes of an order completing, a strong selling point when recruiting vendors.
WC Vendors Pro: Payout Options
WC Vendors uses Stripe Connect for automatic payouts. Configure it at WP Admin > WC Vendors > Settings > Payments. Without Stripe Connect, payouts are manual, the admin processes each vendor payment by hand using PayPal mass pay or bank transfer. For stores with more than 5–6 active vendors, manual payouts become unmanageable quickly.
Handling Withholding Tax on Commission Payouts
If your marketplace operates in the United States and pays vendors more than $600 in a calendar year, you likely have 1099 reporting obligations. Some jurisdictions also require withholding a percentage of vendor earnings before disbursement.
None of the three plugins fully automate tax form generation, but WCFM Ultimate has the most built-in support:
- WCFM Ultimate: Under Settings > Payment > Tax Withholding, you can define a withholding percentage that is deducted from vendor earnings before payout. This amount is held by the platform for tax remittance. Commission reports export the gross and net figures separately.
- Dokan Pro: Does not include native withholding. Use the
dokan_get_vendor_commission_datafilter to hook custom tax logic, or use a third-party tax compliance plugin. - WC Vendors Pro: No native withholding support. Custom code or a compliance plugin is required.
For US-based marketplaces handling vendor payouts at scale, budget for either WCFM Ultimate’s built-in handling or an external compliance service like TaxJar or Avalara integrated at the payout layer.
Commission Reporting and Reconciliation
Vendors need to trust that your commission calculation is accurate. Good reporting builds that trust and reduces support tickets.
Dokan Pro Reports
Dokan provides commission reports at WP Admin > Dokan > Reports. You can filter by vendor, date range, and order status. Vendors see their own earnings breakdown in their vendor dashboard at Vendor Dashboard > Reports > Earning. Each line shows the order total, admin commission deducted, and net payout.
WCFM Reports
WCFM’s reporting is the most granular of the three. Admins can access WP Admin > WCFM > Reports and filter by vendor, product, category, and time period. Reports include gross sales, admin commission, vendor commission, refunds, and net figures. This data exports to CSV for accounting purposes.
WC Vendors Reports
WC Vendors Pro provides basic commission reports in the admin area. The detail level is lower than Dokan or WCFM, you get totals per vendor per period but not the per-order breakdown without querying the database directly. Adequate for simple setups, limiting for complex ones.
Practical Commission Setup: A Step-by-Step Example
Here is a concrete walkthrough using Dokan Pro to set up a marketplace with three commission tiers for an art and craft store:
- Set the global fallback: WP Admin > Dokan > Settings > Selling Options. Set Commission Type to Percentage, Admin Commission to
30. This is the baseline for new vendors with no track record. - Enable tiered commissions: Change Commission Type to Tiered. Add three rows: $0–$999 at 30%, $1,000–$4,999 at 20%, $5,000+ at 10%.
- Override for digital downloads category: Go to Dokan > Settings > Selling Options > Commission by Category. Set the Digital Downloads category to 15% flat, lower than physical goods because there is no fulfillment cost.
- Override for your anchor vendor: WP Admin > Dokan > Vendors > [Vendor Name] > Edit. Enable Override Default Commission, set rate to 8%. This vendor has negotiated a preferred rate due to high volume.
- Set withdrawal threshold: Dokan > Settings > Withdraw. Set threshold to 14 days, minimum withdrawal to $25.
- Connect Stripe: Enable Stripe Connect for automatic disbursements. Vendors connect their Stripe accounts through their dashboard.
Total setup time: approximately 30 minutes for a store with 10–15 vendors.
Common Commission Configuration Mistakes
- Including tax in the commission base: Always exclude tax from commission calculations. Charging a percentage of the tax portion means you’re taking a cut of the government’s money.
- Including shipping fees: Vendors often set their own shipping rates. Commission on shipping cost is a hidden fee that erodes trust. Exclude it explicitly in plugin settings.
- No minimum withdrawal threshold: Without a minimum, vendors can request $2 payouts. Payment processor fees will exceed the transfer amount. Set a sensible floor.
- Forgetting refund handling: When an order is refunded, verify that your plugin reverses the commission. Dokan and WCFM handle this automatically; WC Vendors requires checking the configuration under Settings > Commissions > Refund Handling.
- No per-product testing: After setting up category or vendor overrides, always place a test order for a product in each commission tier and verify the calculated amounts in the order detail screen before going live.
Choosing the Right Commission Plugin for Your Store
- Dokan Pro, Best all-around choice. Strong community, good documentation, tiered commissions included, Stripe Connect for automatic payouts. Best for stores expecting 10–200 vendors.
- WCFM Marketplace / WCFM Ultimate, Best feature depth. Category commissions, withholding tax, and the most detailed reporting. Best for complex marketplace models with many product categories and tax obligations.
- WC Vendors Pro, Best for simple setups. If you need global commission with Stripe Connect payouts and do not need tiered rates or category overrides, WC Vendors Pro keeps the admin interface clean and the codebase lightweight.
Next Steps
Commission configuration is article 2 in a 6-part series on building WooCommerce multi-vendor marketplaces. If you are just getting started, read the first article on selecting and installing a multi-vendor plugin for WooCommerce. If you already have commissions set up, the next article covers vendor onboarding workflows, approval rules, required documentation, and how to automate the vendor application process.
If you are building a marketplace and need a custom commission structure that none of these plugins handle out of the box, the WooCommerce filter hooks dokan_get_vendor_commission_data, wcfm_commission_details, and wcv_commission_rate each give you full programmatic control over the final payout amount.
A well-structured commission system is one of the few settings in your marketplace that directly affects vendor satisfaction, vendor retention, and platform revenue, all at the same time. Get the tiers right early and revisit them every quarter as your vendor mix evolves.